Are you curious about RV inverters? These devices are essential for RV enthusiasts.
They convert DC power to AC power, allowing you to use household appliances on the road. Understanding what an RV inverter looks like can be helpful for maintenance and troubleshooting. Typically, an RV inverter is a rectangular box with several ports and switches.
It is usually compact and designed to fit into small spaces. Knowing the appearance of an inverter can help you identify it easily in your RV. This guide will explain the features and components of an RV inverter, ensuring you can recognize it and understand its importance. Stay tuned to learn more about this crucial RV component.
Introduction To Rv Inverters
RV inverters are essential for modern RV living. They convert DC power from your RV’s batteries into AC power. This allows you to use household appliances on the road. Understanding RV inverters is crucial for a seamless travel experience.
Purpose And Importance
RV inverters provide power to devices like microwaves, TVs, and laptops. They ensure you have a comfortable experience without relying on external power sources. Inverters are vital for off-grid camping. They let you enjoy modern conveniences anywhere.
Common Types
There are several types of RV inverters. The most common is the pure sine wave inverter. It offers clean power, similar to a home outlet. Another type is the modified sine wave inverter. It is more affordable but may cause issues with sensitive electronics. Finally, there are inverter chargers. These combine an inverter and a battery charger in one unit.
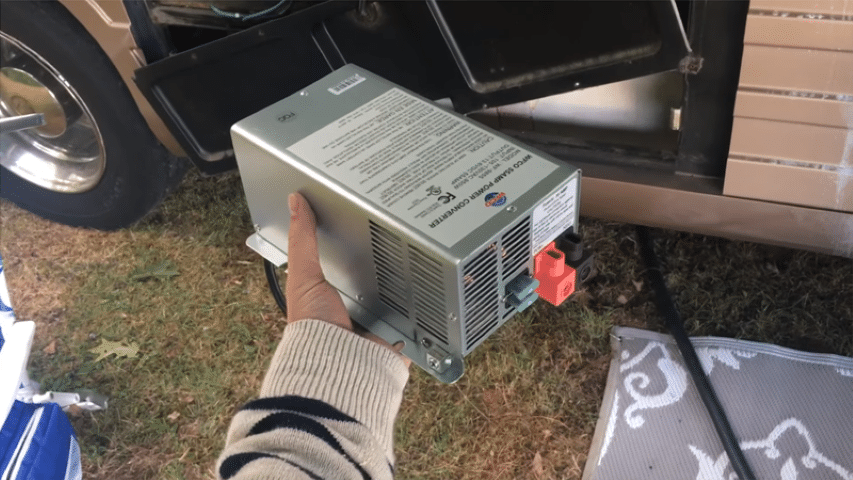
Physical Appearance
Understanding the physical appearance of an RV inverter can help you identify it easily within your vehicle. Knowing its size, design, and dimensions ensures you can install it correctly and maintain it properly.
Size And Dimensions
RV inverters vary in size and dimensions. Typically, they are compact and designed to fit within small spaces. Most inverters are rectangular or box-shaped. They range from 8 to 20 inches in length, 6 to 10 inches in width, and 2 to 6 inches in height.
These dimensions make it easy to mount the inverter in tight spaces. The weight can range from a few pounds to over 20 pounds. This depends on the power capacity and model of the inverter.
Exterior Design
RV inverters have a sturdy exterior design. They usually feature a metal or hard plastic casing. This protects the internal components from damage. The casing often has ventilation slots or fans. These ensure proper cooling during operation.
The front panel of the inverter typically includes several indicators and ports. These may include power buttons, LED lights, and connection ports for cables. Some models have digital displays. These show important information like voltage, power output, and error messages.
Overall, the design is practical and functional. This makes it easy for users to operate and maintain their RV inverters.
Key Components
An RV inverter is a vital part of your RV’s electrical system. Understanding its key components helps you maintain and use it effectively. Let’s explore the main parts that make up an RV inverter.
Input And Output Ports
The input ports are where the inverter connects to the RV battery. They receive the DC (Direct Current) power from the battery. The output ports are where the inverter sends the converted AC (Alternating Current) power. You use these ports to plug in your devices.
Here’s a simple table to illustrate the ports:
| Port Type | Function |
|---|---|
| Input Ports | Receive DC power from the battery |
| Output Ports | Send AC power to your devices |
Cooling Fans
Cooling fans are essential to keep the inverter from overheating. They activate when the inverter gets too hot. These fans are usually located on the sides or back of the inverter.
Proper cooling ensures the inverter runs smoothly. Overheating can cause damage or reduce its lifespan. Always ensure the fans are working correctly.

Credit: m.youtube.com
Display And Controls
The display and controls of an RV inverter are essential for understanding its operation. They provide real-time information and allow you to manage the device easily. Let’s explore the different components, including LCD screens, buttons, and switches.
Lcd Screens
Many RV inverters come with LCD screens. These screens show vital information. You can see battery levels, power output, and system status. Some screens are backlit for easy reading in low light. The display helps you monitor your power usage efficiently.
Buttons And Switches
Buttons and switches are crucial for controlling the inverter. They enable you to turn the inverter on or off. Some buttons let you switch modes or reset the device. The design is usually straightforward for user convenience. Clear labels make it easy to understand their functions.
Installation Points
Installing an RV inverter can seem daunting, but it’s manageable with the right guidance. Understanding the key installation points, including mounting options and space requirements, will make the process smoother.
Mounting Options
There are several ways to mount an RV inverter. Some prefer a wall mount for easier access. Others choose a floor mount to save wall space. Here are a few common mounting options:
- Wall Mount: Keeps the inverter visible and accessible.
- Floor Mount: Ideal for saving wall space.
- Under-bench Mount: Utilizes hidden spaces effectively.
Make sure the mounting surface is strong and stable. It should support the inverter’s weight. Use screws and brackets provided by the manufacturer. Ensure the inverter is secure and does not vibrate during travel.
Space Requirements
Space is a crucial factor for inverter installation. Make sure there is enough room for ventilation. Poor ventilation can cause the inverter to overheat. Here’s what you need to consider:
| Aspect | Details |
|---|---|
| Ventilation | Leave at least 6 inches of space around the inverter. |
| Accessibility | Ensure easy access for maintenance and monitoring. |
| Proximity to Battery | Install the inverter close to the battery to reduce cable length. |
Following these space requirements will help in efficient inverter operation. It will also ensure safety and longevity of the device. Plan the installation space carefully before mounting the inverter.

Credit: changinglanesrv.com
Safety Features
RV inverters are equipped with various safety features to ensure the smooth and secure operation of your electrical system. These features prevent damage to the inverter and connected appliances. Two crucial safety features are Overload Protection and Thermal Shutdown.
Overload Protection
Overload protection is essential for any RV inverter. This feature safeguards the inverter from excessive loads. If the power demand exceeds the inverter’s capacity, the overload protection will automatically shut down the device. This prevents damage and ensures the longevity of the inverter.
To illustrate, here’s what overload protection does:
- Monitors the power usage continuously
- Shuts down the inverter if the load is too high
- Prevents overheating and potential fire hazards
Thermal Shutdown
The thermal shutdown feature is another critical aspect of an RV inverter. This function protects the inverter from overheating. If the internal temperature rises too high, the thermal shutdown will activate. This prevents damage and ensures the inverter operates within safe temperature limits.
Key benefits of thermal shutdown include:
- Monitors internal temperatures constantly
- Automatically shuts down the inverter if it overheats
- Prevents damage to the inverter and connected devices
Both overload protection and thermal shutdown are essential for the safe and efficient operation of your RV inverter. They ensure your electrical system remains reliable and secure.
Maintenance Tips
Proper maintenance of your RV inverter ensures its longevity and efficiency. Regular upkeep can prevent costly repairs and unexpected failures. By following these simple maintenance tips, you can keep your inverter in top shape and enjoy your travels without worries.
Cleaning Guidelines
Dust and dirt can damage the inverter. Keep it clean to avoid this. Use a soft, dry cloth to wipe the surface. Avoid using water or chemicals. They can damage the components. Ensure the inverter is off before cleaning. This is for your safety.
Routine Inspections
Regular checks can catch problems early. Inspect the inverter for any visible damage. Look for loose connections or burnt wires. Listen for unusual sounds. These can signal an issue. Check the cooling fan. It should be free of dust and debris. Ensure all connections are tight and secure.
Test the inverter output regularly. Use a multimeter to check the voltage. It should match the rated output. If you notice any irregularities, consult a professional. Regular inspections help in maintaining the efficiency of your inverter.

Credit: www.renogy.com
Choosing The Right Inverter
Choosing the right RV inverter is crucial for a smooth and enjoyable trip. The right inverter ensures your appliances run efficiently. But how do you pick the right one? Let’s dive into the key factors.
Power Needs Assessment
First, assess your power needs. List all appliances you’ll use in your RV. Include their wattage. This step helps in knowing the total power required.
For example:
- Microwave: 1000 watts
- TV: 200 watts
- Laptop: 100 watts
Add up these numbers. This gives you a clear idea of the inverter capacity you need. Choose an inverter that can handle a bit more than your total wattage. This extra capacity helps with any sudden power spikes.
Compatibility Check
Next, check compatibility. Not all inverters work with all RVs. Ensure the inverter you pick matches your RV’s electrical system. Look at the voltage requirements. Most RVs use a 12V system, but some use 24V.
Here is a simple table to help you:
| RV Voltage System | Inverter Type |
|---|---|
| 12V | 12V Inverter |
| 24V | 24V Inverter |
Also, check the inverter’s physical size. Ensure it fits in the space available in your RV. Some inverters are bulky. Measure the space where you plan to install it.
Lastly, consider the inverter’s features. Do you need USB ports? Remote control? Choose an inverter that meets your specific needs.
Frequently Asked Questions
What Does An Rv Inverter Look Like?
An RV inverter is a rectangular box with various ports and cables. It typically has a metal casing.
How Do I Identify An Rv Inverter?
Look for a metal box with cooling vents, power switches, and input/output ports. It’s usually near the battery.
Where Is The Inverter Located In An Rv?
The RV inverter is often located near the battery compartment or electrical control panel. It should be easily accessible.
What Are The Components Of An Rv Inverter?
An RV inverter consists of input/output ports, cooling vents, power switches, and sometimes a digital display. These components help it function effectively.
Conclusion
An RV inverter is a vital piece of equipment. It converts DC power to AC power. This helps run your appliances smoothly. Understanding its look and function is essential. It makes RV life more convenient. Knowing what it looks like helps in maintenance.


