Understanding the RV water heater check valve diagram is essential for maintenance. It helps ensure your water heater works efficiently.
Your RV water heater relies on a check valve to control water flow. This small yet vital component prevents backflow, which can cause damage. Knowing how to read the check valve diagram is crucial for troubleshooting and repairs. Whether you’re a seasoned RV owner or new to the lifestyle, learning about this part can save you time and money.
This guide will walk you through the basics, making it easy to understand the diagram and keep your water heater in top condition. So, let’s dive into the details and get your RV running smoothly.

Credit: medium.com
Introduction To Rv Water Heater Check Valves
An RV water heater check valve is a vital component. It ensures water flows in the correct direction. Without it, you could face several issues with your RV water heater. This guide will help you understand the importance and types of check valves for your RV water heater. Knowing this can save you time and stress on your travels.
Importance Of Check Valves
Check valves prevent backflow in your RV water heater. They keep cold and hot water separate. This separation is crucial for efficient heating. It also prevents contamination of your water supply. Without a check valve, your heater may not work properly. This could lead to unexpected repair costs.
Common Types Of Check Valves
There are several types of check valves used in RV water heaters. The most common one is the spring-loaded check valve. It uses a spring to control the flow of water. Another type is the ball check valve. It has a ball that blocks the flow when needed. Lastly, there is the diaphragm check valve. It uses a flexible diaphragm to control water flow.
Each type has its own benefits. Spring-loaded valves are reliable and easy to maintain. Ball check valves are simple and durable. Diaphragm check valves offer smooth operation. Choosing the right one depends on your specific needs.
How Rv Water Heater Check Valves Work
Understanding how an RV water heater check valve works is crucial for maintaining your RV’s plumbing system. The check valve plays a vital role in ensuring water flows in the correct direction, preventing backflow and potential contamination. Let’s dive into the basics of how these valves function and the flow control mechanism behind them.
Basic Functionality
The basic functionality of an RV water heater check valve is straightforward. It allows water to flow into the heater but prevents it from flowing back out. This one-way valve ensures that hot water stays in the tank and does not mix with the cold water supply. Without this valve, the system could face issues like backflow, reducing the efficiency of your water heating process.
Flow Control Mechanism
The flow control mechanism of an RV water heater check valve is designed to maintain the correct flow direction. Inside the valve, there is a spring-loaded mechanism. When water flows in the desired direction, the spring compresses, allowing water to pass through. If water tries to flow back, the spring pushes the valve closed, stopping the reverse flow.
Here is a simple representation of how it works:
| Flow Direction | Valve Action |
|---|---|
| Correct Direction | Spring compresses, valve opens |
| Reverse Direction | Spring expands, valve closes |
This mechanism ensures that hot water remains in the heater, and cold water stays in the supply line. Understanding this process can help you troubleshoot any issues with your RV’s water heater system.
Identifying Check Valve Issues
The check valve in your RV water heater is crucial. It stops backflow and ensures the proper function of your water system. Identifying issues early can save time and money. Let’s explore common signs and problems.
Signs Of A Faulty Check Valve
A faulty check valve can cause several issues. Here are some signs to watch for:
- Water backflow: Water flows in the wrong direction.
- Reduced water pressure: Noticeable drop in water flow.
- Strange noises: Unusual sounds from the water heater.
- Water heater not heating: The water stays cold.
Common Problems
Several common problems can affect the check valve in your RV water heater:
| Problem | Description |
|---|---|
| Clogged Valve | Debris or mineral buildup blocks the valve. |
| Worn-out Components | Parts wear out over time and need replacement. |
| Improper Installation | Incorrect installation can cause malfunction. |
| Valve Stuck Open or Closed | The valve fails to open or close properly. |
Understanding these signs and problems helps in maintaining your RV water heater. Early detection ensures a smoother and more enjoyable RV experience.
Tools Needed For Check Valve Inspection
Inspecting the check valve in your RV water heater requires some basic tools. Having the right tools ensures a smooth and efficient inspection process. This section covers the essential and optional tools you might need.
Essential Tools
You will need a few basic tools for a check valve inspection. First, a wrench is essential for loosening and tightening connections. Second, a screwdriver will help remove any screws holding the check valve in place. Third, pliers are useful for gripping and turning parts that are hard to handle with your hands.
A flashlight is crucial for seeing into small or dark spaces. Having a bucket or a container is helpful to catch any water that spills during the inspection. Towels or rags are also needed to clean up any spills and keep the area dry.
Optional Tools For Better Results
Some tools can make the inspection process easier. A digital camera or smartphone can be used to take pictures of the setup before disassembly. This helps you remember how everything fits together. A small mirror can help you see areas that are hard to view directly.
Using a pipe wrench provides better grip and leverage, especially for stubborn connections. An adjustable wrench is also useful for various sizes of nuts and bolts. Finally, thread seal tape ensures a tight seal when you reassemble the check valve connections.
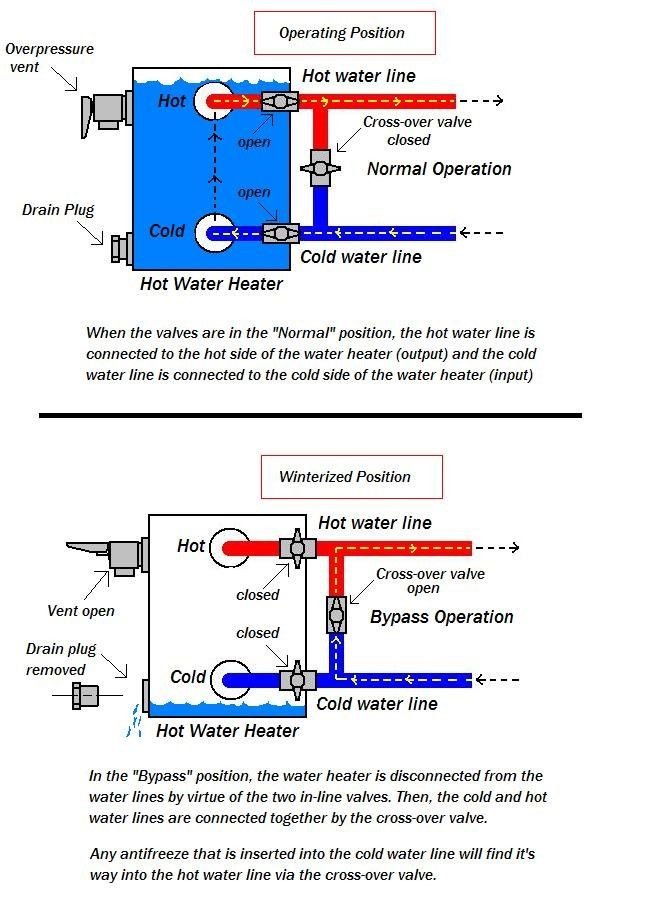
Step-by-step Diagram Guide
Understanding your RV water heater check valve can save you time and hassle. A detailed diagram can make this process easier. In this section, we will walk you through a step-by-step guide.
Reading The Diagram
First, find the legend or key on your diagram. This will help you identify different symbols. Take a few minutes to familiarize yourself with the layout. Note the location of the check valve. It should be clearly marked.
Next, look at the directional arrows. These show the flow of water through the system. Make sure you follow these arrows carefully. They will guide you in understanding how the system works.
Key Components To Identify
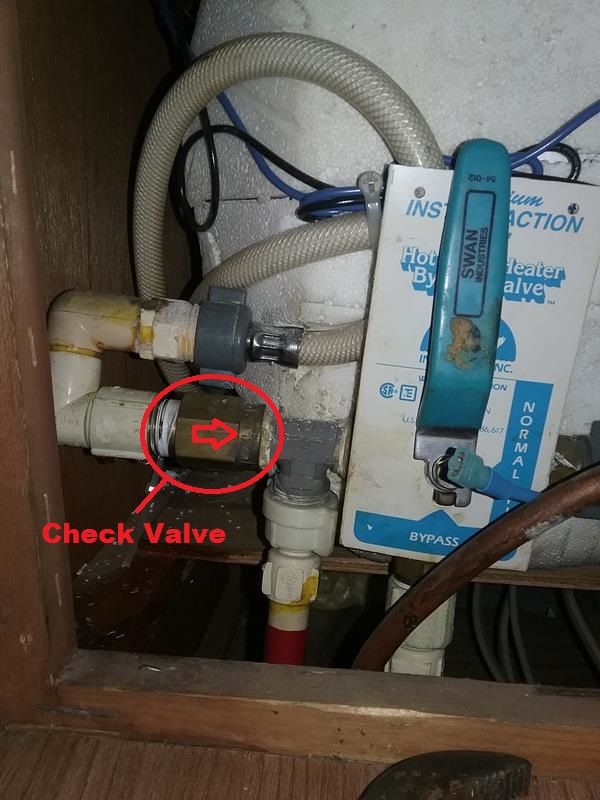
Check valves are crucial for preventing backflow. Locate the check valve symbol in the diagram. It usually looks like a small triangle. Identify the inlet and outlet points of the valve.
Now, find the water heater. It is often marked with a rectangle or another clear symbol. Trace the pipes connecting the check valve to the water heater. This will help you understand the water flow.
Also, look for other important components. These may include the cold water inlet, hot water outlet, and bypass valve. Each part plays a specific role in the system. Knowing their positions will give you a full picture.
By understanding these key components, you can better maintain your RV water heater. This knowledge will make troubleshooting easier.
Diy Check Valve Replacement
Replacing the check valve in your RV water heater can seem daunting. But with a bit of guidance, it becomes a manageable task. This DIY guide will walk you through the process step-by-step. Let’s dive into the details.
Removing The Old Valve
First, turn off the water supply to your RV. This prevents any unwanted leaks. Next, locate the check valve. It’s usually at the back of the water heater. Use a wrench to loosen the connections. Be careful not to damage surrounding pipes. Once loose, remove the old valve carefully. Dispose of it properly.
Installing The New Valve
Take your new check valve and position it correctly. Ensure the arrow points in the direction of water flow. Connect the valve to the water heater. Use a wrench to tighten the connections securely. Double-check for any leaks. Turn the water supply back on. Test the water heater to ensure it’s working properly.
Maintenance Tips
Maintaining your RV water heater check valve is crucial for its longevity and efficiency. Proper maintenance ensures smooth operation and prevents potential issues. Below are some essential maintenance tips to keep your RV water heater in top shape.
Regular Inspection Routine
Performing a regular inspection routine can help identify issues early. Check for leaks around the check valve. Look for any signs of wear or damage. If you see any, it might be time to replace the valve.
- Inspect the valve every month.
- Check for rust or corrosion.
- Ensure all connections are tight.
Use a flashlight for a closer look. Clean the area around the valve to see clearly. Regular inspections can prevent bigger problems down the line.
Preventive Measures
Taking preventive measures can save time and money. Always use clean water to avoid sediment buildup in the valve. Sediment can cause blockages and reduce efficiency.
Consider installing a water softener if your water source is hard. Hard water can cause mineral deposits. These deposits can damage the check valve.
Flush the water heater tank regularly. This removes any sediment that has settled at the bottom. A clean tank means a longer life for your check valve.
Here’s a simple table to summarize the preventive measures:
| Measure | Frequency | Purpose |
|---|---|---|
| Use clean water | Always | Prevent sediment buildup |
| Install water softener | Once | Reduce mineral deposits |
| Flush water heater tank | Every 6 months | Remove sediment |
Following these tips can help your RV water heater check valve last longer and work more efficiently.
Credit: www.1999southwind.com
Conclusion And Final Thoughts
Understanding the RV water heater check valve diagram is vital. It ensures your RV’s hot water system runs smoothly and efficiently. Let’s recap the important points and highlight the need for proper maintenance.
Recap Of Key Points
- A check valve prevents backflow in the water heater.
- Recognize the different parts of the diagram.
- Know the common issues: leaks, blockages, and valve failure.
- Regular inspection and cleaning keep the system working.
The check valve is a small but crucial part. Any issue with it can disrupt your entire water heating system. Recognize the signs of wear and tear.
Encouragement For Proper Maintenance
Regular maintenance of your RV water heater is essential. Follow these simple steps to keep it in top condition:
- Inspect the check valve for any visible damage.
- Clean the valve and surrounding areas.
- Replace the valve if you notice leaks or blockages.
- Use the correct tools to avoid damaging the valve.
By following these steps, you can extend the life of your RV water heater. Proper care ensures you have hot water whenever you need it.
| Task | Frequency |
|---|---|
| Inspect check valve | Every 6 months |
| Clean valve | Every 6 months |
| Replace valve | As needed |
Maintaining your RV water heater may seem like a chore. But it is essential for a trouble-free adventure. Take the time to understand the diagram and follow the maintenance tips. Your efforts will pay off with a reliable and efficient water heating system.
Frequently Asked Questions
What Is An Rv Water Heater Check Valve?
An RV water heater check valve is a device that prevents backflow of water. It ensures hot water flows correctly and maintains proper pressure.
How Does An Rv Water Heater Check Valve Work?
The check valve allows water to flow in one direction only. It prevents cold water from mixing with hot water.
Why Is My Rv Water Heater Check Valve Leaking?
A leaking check valve might be due to wear and tear or debris. Regular maintenance can prevent leaks.
Can I Replace The Rv Water Heater Check Valve Myself?
Yes, you can replace it yourself with basic tools. Ensure you follow the manufacturer’s instructions for safe replacement.
Conclusion
Understanding the RV water heater check valve diagram is crucial. It helps with proper maintenance. Avoid potential issues by following the diagram closely. Regular checks ensure your heater works well. Save time and money with early detection. Keep your RV trips smooth and enjoyable.


