Is your RV not getting power from the battery? This can be frustrating, especially when you’re ready to hit the road.
Don’t worry; we’ve got you covered. Understanding why your RV is not getting power from the battery is crucial. It might seem like a minor issue, but it can disrupt your travel plans. In this post, we’ll explore common reasons behind this problem and provide practical solutions.
Whether it’s a dead battery, loose connections, or a faulty converter, we’ll help you diagnose and fix the issue. Stay tuned to get your RV back to its full potential, ensuring your adventures go smoothly. Let’s dive into the details and get your RV powered up again.
Common Causes
RV not getting power from the battery? Common causes include loose connections, blown fuses, or a drained battery. Check these elements to restore power.
Experiencing issues with your RV not getting power from the battery can be frustrating. Identifying the root cause is essential to fixing the problem. Here, we will explore some common causes. Understanding these can help you troubleshoot and solve the issue faster.
Battery Connection Issues
One of the most common reasons for power problems is poor battery connections. Loose or corroded connections can interrupt the power flow. Inspect the battery terminals for any signs of corrosion. Clean them if necessary. Ensure the connections are tight and secure. A simple check can often solve the problem.
Faulty Battery
Another possible cause is a faulty battery. Batteries have a limited lifespan. Over time, they can lose their ability to hold a charge. Test the battery with a multimeter. This can help determine if it is still in good condition. If the voltage is too low, it may be time to replace the battery. A faulty battery can often be the culprit behind power issues. “`
Checking Battery Voltage
If your RV is not getting power from the battery, the first step is to check the battery voltage. This helps you understand whether the battery is charged or needs replacement. Using a multimeter is the best way to measure battery voltage accurately.
Using A Multimeter
A multimeter is an essential tool for checking battery voltage. Follow these steps to use it:
- Set the multimeter to DC voltage.
- Connect the red probe to the positive terminal of the battery.
- Connect the black probe to the negative terminal of the battery.
- Read the voltage displayed on the multimeter screen.
Interpreting Results
Understanding the voltage readings is key to diagnosing battery issues. Use the table below to interpret your results:
| Voltage Reading | Battery Status |
|---|---|
| 12.6V or higher | Fully charged |
| 12.4V – 12.6V | Partially charged |
| 12.0V – 12.4V | Needs charging |
| Below 12.0V | Discharged |
If the battery is below 12.0V, it may not power your RV efficiently. Charging the battery or replacing it could solve the issue.
Inspecting Battery Connections
Experiencing power issues in your RV can be frustrating. One common problem is the RV not getting power from the battery. A key step to solving this is inspecting the battery connections. Proper connections ensure a steady power supply. This section covers cleaning corroded terminals and ensuring tight connections.
Cleaning Corroded Terminals
Corroded terminals can disrupt the power flow. To clean them, start by disconnecting the battery. Use a mixture of baking soda and water. Apply it to the terminals. This helps break down the corrosion. Scrub the terminals gently with a wire brush. Rinse with clean water. Dry them thoroughly before reconnecting.
Ensuring Tight Connections
Loose connections can cause power loss. Check the battery cables. Ensure they are tightly connected to the terminals. Use a wrench to tighten any loose connections. Avoid overtightening to prevent damage. Make sure the cables are secure. This ensures a stable power supply to your RV.

Credit: www.amazon.com
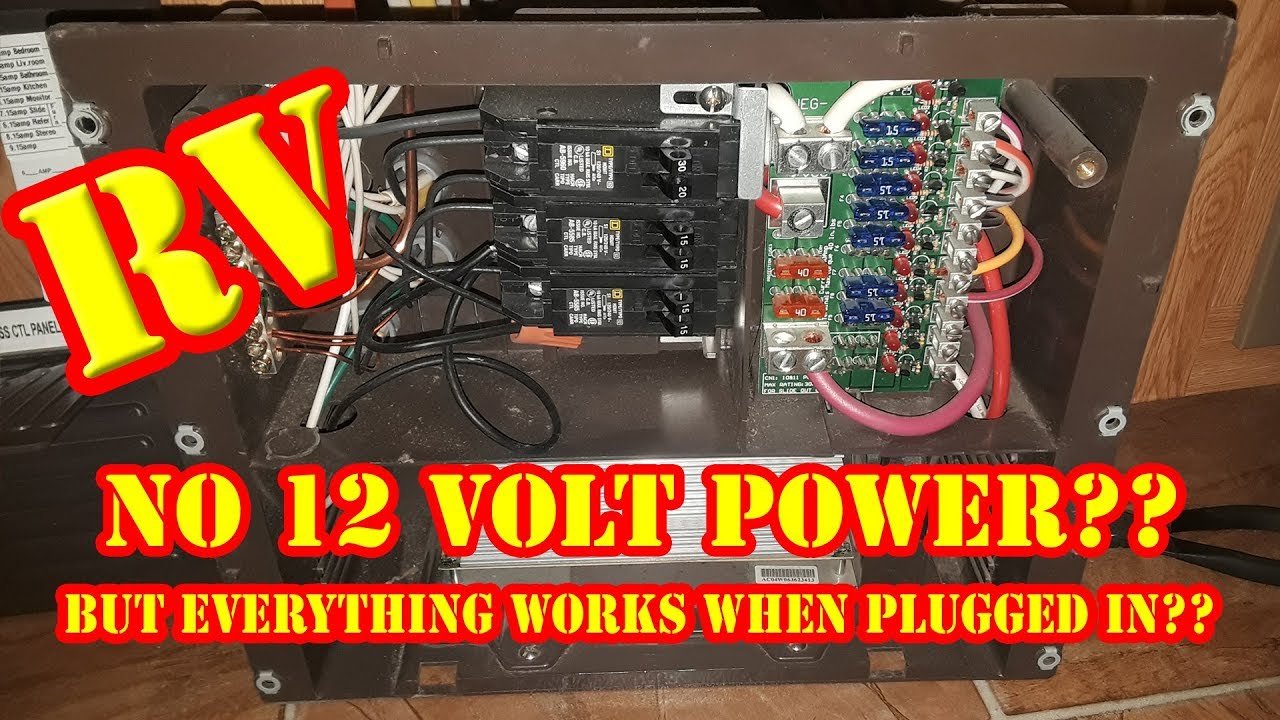
Examining Fuses And Breakers
Ensuring your RV gets power from the battery is crucial. One common issue is a problem with fuses and breakers. These components protect your electrical system. If they fail, power may not flow. Checking and fixing them can solve the problem quickly.
Locating Fuse Box
First, find the fuse box in your RV. It’s usually near the battery. Look in the manual if unsure. Once located, open it carefully. Keep the manual handy for reference.
Replacing Blown Fuses
Blown fuses are easy to spot. They have a broken wire inside. Remove the faulty fuse with care. Use a fuse puller if available. Replace it with a new one of the same rating. Ensure it fits snugly. Test your RV’s power. If still no power, check other fuses.
Assessing The Power Converter
Your RV relies on a power converter to change AC power to DC. This DC power charges the battery and runs DC-powered appliances. If your RV is not getting power from the battery, the power converter might be the issue. Assessing the power converter can help diagnose and solve the problem.
Identifying Converter Issues
The first step is to identify if the converter is malfunctioning. Listen for a humming noise. This noise indicates the converter is working. If you hear no noise, there might be an issue. Look for any blinking lights or error codes on the converter. These signs can indicate specific problems. Check for any burnt smells. A burnt smell can mean the converter has overheated or failed.
Testing Converter Output
Use a multimeter to test the converter output. Set the multimeter to DC voltage. Connect the multimeter probes to the output terminals of the converter. A healthy converter should show a voltage between 13.6V and 14.4V. If the reading is lower, the converter might be faulty. If the reading is zero, the converter is not working.
Inspect the fuses and circuit breakers. Replace any blown fuses or tripped breakers. This could restore power to the converter. Regularly test the converter to ensure it is functioning correctly. Proper maintenance can prevent power issues in your RV.
Checking The Battery Charge
Is your RV not getting power from the battery? The first step is to check the battery charge. A well-charged battery is vital for your RV’s electrical system. If the battery charge is low, your RV appliances and lights will not work properly.
Let’s explore the key aspects of checking the battery charge.
Battery Charger Functionality
Ensure your battery charger works correctly. A faulty charger can leave your battery undercharged. Inspect the charger for any signs of damage. Check the connections to make sure they are secure.
Turn on the charger and observe the indicator lights. These lights show whether the battery is charging or fully charged. If the charger has no lights, it might be broken. Consider using a multimeter to test the charger output. The voltage should match the battery’s requirements.
Charging Methods
Different methods can charge your RV battery. Shore power is the most common method. Plug your RV into an external power source. This will charge the battery through the RV’s converter.
Solar panels are another option. They provide a renewable energy source. Ensure the solar panels are clean and positioned correctly for maximum efficiency.
Generators can also charge your battery. They are useful when off-grid. Ensure your generator is in good condition. Follow the manufacturer’s instructions for connecting it to your RV.
Portable chargers are handy for emergencies. They can jump-start a dead battery. Keep one in your RV for peace of mind.
Check your battery charge regularly. Use a voltmeter to measure the voltage. A fully charged 12-volt battery should read around 12.6 volts. If the reading is below 12 volts, it needs charging.
Evaluating Solar Panels
Solar panels are a great way to power your RV. They can help save on energy costs and are eco-friendly. But sometimes, your solar panels might not work as expected. Let’s look at how to evaluate your solar panels to ensure they are working properly.
Solar Panel Connection
Check the connections first. Ensure all cables are securely attached. Loose connections can cause power issues. Look for any visible damage to wires. Damaged wires can stop power flow from the panels to the battery.
Use a multimeter to check voltage. Place the probes on the terminals. A reading between 14 to 20 volts is good. If the reading is low, the panels may not be working properly.
Panel Efficiency
Panel efficiency is crucial. It tells how well your panels convert sunlight into power. Check the panel surface for dirt or debris. Clean panels perform better. Use a soft cloth to wipe them clean. Avoid abrasive materials as they can scratch the surface.
Inspect the panels for any cracks or damage. Even small cracks can affect efficiency. Replace damaged panels to maintain optimal performance. Panels should face direct sunlight. Adjust the angle if necessary. Shadows can greatly reduce efficiency.
| Issue | Solution |
|---|---|
| Loose connections | Secure all cables |
| Dirty panels | Clean with a soft cloth |
| Cracked panels | Replace damaged panels |
| Shadows on panels | Adjust panel angle |
By following these steps, you can ensure your solar panels are working efficiently. This will help keep your RV powered and ready for your next adventure.
Seeking Professional Help
Sometimes, RV power issues go beyond simple fixes. Understanding when to seek professional help can save time and frustration. Technicians have the expertise to diagnose and repair complex problems. Let’s discuss when you should consult a technician and how to choose a reliable service.
When To Consult A Technician
If your RV’s battery isn’t charging, it might be time to call a pro. You should also consider a technician if you notice unusual smells or sounds. These could indicate deeper electrical problems. Do not attempt to fix these issues yourself. Safety first.
Another sign is if your RV’s lights flicker or go out completely. This can be a sign of a serious problem. A technician can quickly diagnose and fix the issue. If your battery drains quickly, this might indicate a parasitic draw or a faulty battery. A professional can help identify the root cause.
Choosing A Reliable Service
Not all repair services are equal. Look for certified technicians with good reviews. Check their credentials and experience with RVs. Ask friends or fellow RV owners for recommendations. A reliable service will offer a clear estimate and explain the repairs needed.
Make sure to choose a service that stands behind their work. Warranty on repairs is a good sign. Trustworthy services are transparent about costs and timeframes. They should also use quality parts for repairs. Do your research before making a decision.
Frequently Asked Questions
Why Is My Rv Battery Not Charging?
Your RV battery might not charge due to faulty wiring, a blown fuse, or a defective converter. Check these components to ensure they are functioning properly.
How Do I Test My Rv Battery?
You can test your RV battery using a multimeter. Set it to DC volts and check the voltage level. A fully charged battery should read around 12. 6 volts.
What Could Drain My Rv Battery Quickly?
Appliances left on, parasitic loads, or a faulty battery can drain your RV battery quickly. Ensure all devices are off when not in use.
Can A Bad Converter Affect My Rv Battery?
Yes, a bad converter can prevent your RV battery from charging properly. Inspect the converter for any issues and replace it if necessary.
Conclusion
Resolving RV battery power issues is crucial for a smooth trip. Check connections and ensure the battery is charged. Regular maintenance can prevent problems. Use a multimeter to test the battery voltage. Replace the battery if needed. Keep these tips in mind for a worry-free RV experience.
Happy travels!


