Replacing the RV Comfort ZC thermostat can be a daunting task. But with the right guidance, it becomes manageable.
The RV Comfort ZC thermostat controls your RV’s climate, ensuring a cozy environment. Over time, it may need replacement due to wear and tear or malfunction. A faulty thermostat can lead to inconsistent temperatures, affecting your comfort. Replacing it can restore efficient climate control, making your RV trips pleasant again.
This guide will walk you through the process, providing clear steps and tips. Whether you’re a seasoned RV owner or a newbie, this information will help you handle the replacement with confidence. Let’s dive into the details and get your RV back to its optimal comfort level.
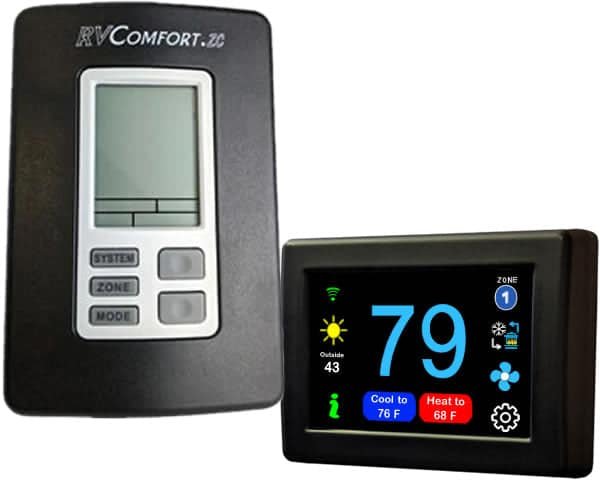
Credit: www.microair.net
Introduction To Rv Comfort Zc Thermostat
The RV Comfort ZC Thermostat is a vital component in any RV. It helps maintain a comfortable temperature while you’re on the road. Without it, managing the climate inside your RV can be challenging. This thermostat is designed specifically for RVs, ensuring optimal performance in varying weather conditions.
Understanding how this thermostat works can help you appreciate its importance. It regulates both heating and cooling systems within your RV. This ensures you enjoy a pleasant environment, no matter the season. Let’s explore why a reliable thermostat is essential and some common issues you might encounter with the RV Comfort ZC.
Importance Of A Reliable Thermostat
A reliable thermostat is crucial for a comfortable RV experience. It ensures your RV stays at the desired temperature. This makes your trips more enjoyable and stress-free. A dependable thermostat also helps in energy efficiency. It minimizes the use of heating and cooling systems, saving power and reducing wear and tear on your equipment.
Peace of mind is another benefit. Knowing that your RV’s climate control is functioning properly allows you to focus on your journey. You won’t have to worry about sudden temperature changes or system failures. This makes a reliable thermostat an essential part of your RV setup.
Common Issues With Rv Comfort Zc
Like any device, the RV Comfort ZC Thermostat can experience problems. One common issue is inaccurate temperature readings. This can result in an uncomfortable environment inside your RV. Another problem is the thermostat not responding to settings. This can be frustrating, especially during extreme weather conditions.
Wiring problems can also occur. Loose or damaged wires can disrupt the thermostat’s functionality. This can lead to erratic temperature control. Additionally, the thermostat might display error codes. These codes indicate specific issues that need to be addressed. Understanding these common problems can help you troubleshoot and maintain your RV Comfort ZC Thermostat effectively.
Benefits Of Upgrading Your Thermostat
Upgrading your RV Comfort ZC Thermostat can bring numerous advantages. A new thermostat can improve your living comfort and save energy. Read on to discover the key benefits of upgrading your thermostat.
Enhanced Temperature Control
A new thermostat offers enhanced temperature control. You can set precise temperatures with ease. This means your RV will stay at your desired comfort level. No more too hot or too cold moments. Enjoy the perfect temperature every time.
Improved Energy Efficiency
One of the major benefits is improved energy efficiency. Modern thermostats are designed to use energy smarter. They adjust heating and cooling based on your needs. This can lead to significant energy savings. Your power bills will be lower, and you’ll help the environment.
Modern thermostats also come with features like programmable settings. You can set the thermostat to lower the temperature at night or when you’re away. This prevents energy waste and keeps your RV comfortable when you need it to be.
| Feature | Benefit |
|---|---|
| Enhanced Temperature Control | Precise and consistent comfort |
| Improved Energy Efficiency | Lower energy bills |
Consider upgrading your thermostat today. Enjoy better comfort and save energy with a new RV Comfort ZC Thermostat.
Tools And Materials Needed
Replacing an RV Comfort ZC thermostat requires some preparation. Having the right tools and materials will make the job easier and safer. In this section, we’ll break down everything you need to get started.
Essential Tools
Before you begin, gather these essential tools:
- Screwdriver set – Different sizes and types for various screws.
- Wire stripper – For cleanly stripping the wires.
- Multimeter – To check electrical connections.
- Drill – For mounting the new thermostat.
- Level – Ensures your thermostat is mounted straight.
- Plier – To grip and twist wires.
Required Materials
Ensure you have the following materials ready:
- Replacement thermostat – The new RV Comfort ZC thermostat.
- Wire nuts – For connecting wires securely.
- Electrical tape – To insulate and protect connections.
- Mounting screws – Often come with the new thermostat.
- Instruction manual – From the thermostat manufacturer.
Having these tools and materials ready will help you replace your thermostat efficiently.
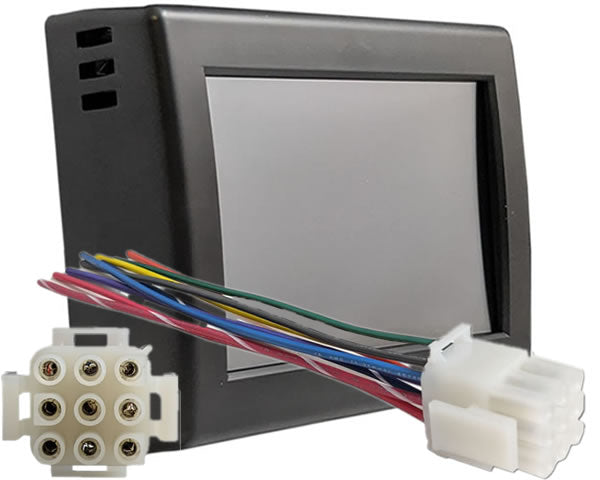
Credit: www.microair.net
Preparing For The Replacement
Replacing the RV Comfort ZC Thermostat can seem daunting. But with the right preparation, it becomes much easier. In this section, we will guide you through the initial steps. You will learn the necessary safety precautions and how to turn off power correctly.
Safety Precautions
Before starting any work, ensure you have the right tools. A screwdriver, wire cutters, and the new thermostat are essential. Wearing protective gloves is also advisable. They protect your hands from sharp edges and electric shocks.
Inspect your work area for any hazards. Make sure the surface is dry and clean. This reduces the risk of slipping or accidental injury. Keep a first-aid kit nearby. Just in case.
Turning Off Power
Turning off the power is crucial. It ensures your safety. Locate your RV’s main power switch. It is usually near the electrical panel. Turn the switch to the “off” position.
Next, disconnect the battery. This step is often overlooked but is very important. Use a wrench to disconnect the negative terminal first. Then, disconnect the positive terminal.
Double-check to ensure the power is off. Attempt to turn on the old thermostat. If it does not respond, you have successfully cut the power.
| Step | Description |
|---|---|
| 1 | Gather tools and safety gear |
| 2 | Inspect work area |
| 3 | Turn off main power switch |
| 4 | Disconnect battery |
| 5 | Double-check power status |
Removing The Old Thermostat
Replacing your RV Comfort ZC thermostat can improve your RV’s climate control. The first step is removing the old thermostat. Let’s break it down into simple steps for you.
Detaching The Unit
Begin by turning off the power to your RV. This ensures safety. Next, locate the screws holding the thermostat to the wall. Use a screwdriver to remove these screws. Keep them safe for later use. Gently pull the thermostat unit away from the wall. Be careful not to damage any wires.
Disconnecting The Wires
Behind the thermostat, you will see several wires connected. Take a photo of the wiring setup. This will help you connect the new thermostat later. Carefully disconnect each wire. Use a small screwdriver to loosen the screws holding the wires. Label each wire with masking tape if needed. This will keep things organized.
With the wires disconnected, you have successfully removed the old thermostat. You are now ready to install the new one.

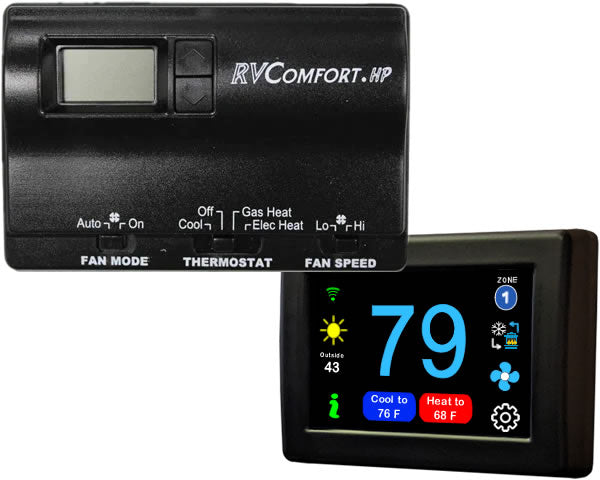
Credit: www.microair.net
Installing The New Thermostat
Replacing your RV Comfort ZC Thermostat can seem hard. But with the right steps, it becomes easy. This guide will help you install the new thermostat. Follow these steps carefully for the best results.
Mounting The New Unit
First, find a good spot on the wall. The new thermostat should be in the same place as the old one. This makes it easier to connect the wires. Use a pencil to mark the holes for the screws.
Next, use a drill to make the holes. Make sure the holes are the right size for the screws. Then, put the screws in place but do not tighten them all the way. Leave a little space to adjust the unit later.
Connecting The Wires
Now, look at the wires coming from the wall. Each wire should match a terminal on the new unit. Check the manual to be sure. Connect each wire to the right terminal. Tighten the screws to hold the wires in place.
Make sure no wires are loose. Loose wires can cause problems. Once all wires are connected, push any extra wire back into the wall. This keeps the area neat and safe.
Testing The New Thermostat
Replacing the RV Comfort ZC Thermostat ensures better temperature control. Testing the new thermostat reveals improved accuracy and efficiency. Enjoy a comfortable RV environment with this easy upgrade.
Testing the New Thermostat After installing your new RV Comfort ZC Thermostat, it’s time to test it. Proper testing ensures the system works well. This process involves a few key steps.
Powering On The System
First, turn on the power to your RV. Check the circuit breaker. Make sure it is in the “on” position. Next, go to your thermostat. Press the power button. The screen should light up. If it does not, recheck your wiring. Fix any loose connections.
Verifying Functionality
Once powered on, test the thermostat’s functions. Set the temperature higher. The heater should start. Feel for warm air coming from the vents. Next, set the temperature lower. The air conditioner should kick in. Feel for cool air. Also, test the fan settings. Ensure the fan runs at different speeds. Check if it turns off when you set it to “auto.” Testing the new thermostat is simple. Follow these steps for a smooth process. Enjoy a comfortable RV experience.
Troubleshooting Common Issues
Experiencing issues with your RV Comfort ZC Thermostat can be frustrating. Addressing common problems can help restore comfort and efficiency. Let’s explore some frequent issues and their solutions.
No Power To The Thermostat
If your RV Comfort ZC Thermostat lacks power, check the power source first. Ensure the RV’s battery is charged. Inspect the fuse related to the thermostat. Replace it if necessary. Next, examine the wiring for any disconnections or damages. Secure any loose connections. If all else fails, the thermostat itself might need replacing.
Inaccurate Temperature Readings
Inaccurate temperature readings can disrupt your comfort. Start by verifying the thermostat settings. Make sure it is set to the correct mode. Clean the thermostat to remove any dust or debris. This can affect the sensor’s accuracy. If the problem persists, recalibrate the thermostat according to the manual. In some cases, a faulty sensor might be the cause. Consider replacing it if necessary.
Maintenance Tips For Longevity
Maintaining your RV Comfort ZC Thermostat is essential for its longevity. A well-maintained thermostat ensures optimal temperature control and energy efficiency. Here are some practical tips to help you keep your thermostat in good working condition for years to come.
Regular Cleaning
Regular cleaning is crucial for the proper functioning of your thermostat. Dust and dirt can accumulate over time, affecting its performance. Follow these steps:
- Turn off the thermostat before cleaning.
- Use a soft brush or a vacuum with a brush attachment to remove dust.
- Clean the thermostat’s exterior with a damp cloth. Avoid using harsh chemicals.
Make sure to clean the thermostat at least once every three months to ensure optimal performance.
Periodic System Checks
Conducting periodic system checks helps identify potential issues before they become major problems. Follow these guidelines:
- Check the thermostat’s battery levels and replace them if needed.
- Ensure the thermostat is correctly calibrated. Refer to the user manual for calibration instructions.
- Inspect the wiring for any signs of wear or damage. Replace any faulty wires.
- Test the thermostat by setting different temperatures to ensure it responds correctly.
Perform these checks every six months to keep your thermostat in top condition.
Frequently Asked Questions
How Do I Replace My Rv Comfort Zc Thermostat?
To replace your RV Comfort ZC thermostat, first, turn off the power. Remove the old unit by unscrewing and disconnecting the wires. Connect the new thermostat by matching the wires, then secure it. Finally, turn the power back on.
What Tools Are Needed For Thermostat Replacement?
For replacing an RV Comfort ZC thermostat, you will need a screwdriver, wire strippers, and possibly a drill. These tools will help you safely remove the old unit and install the new one.
Why Is My Rv Thermostat Not Working?
Your RV thermostat might not be working due to faulty wiring, dead batteries, or a malfunctioning unit. Check the power source and connections. If the issue persists, consider replacing the thermostat.
Can I Install An Rv Thermostat Myself?
Yes, you can install an RV thermostat yourself. It requires basic tools and some knowledge of electrical wiring. Follow the manufacturer’s instructions carefully for a successful installation.
Conclusion
Replacing your RV Comfort ZC thermostat brings many benefits. Improved temperature control. Enhanced energy efficiency. Better comfort during travels. Simple, affordable upgrade. Easy installation process. Follow the steps carefully. Enjoy a more comfortable RV experience. Don’t let an old thermostat ruin your trip.


