Turning off the water to your RV toilet can seem tricky at first. But with a few simple steps, it’s easy to do.
Maintaining your RV’s plumbing is crucial for a hassle-free trip. Knowing how to turn off the water to your RV toilet is essential for repairs or to prevent leaks. This quick guide helps you handle it with ease. Whether you are a seasoned RVer or a newbie, learning this skill can save you time and prevent water damage.
So, let’s dive into the steps needed to turn off the water supply to your RV toilet.
Preparation Steps
Before you can turn off the water to your RV toilet, you need to take a few preparation steps. These steps ensure the process is smooth and you avoid any potential issues. Proper preparation saves time and helps prevent damage to your RV plumbing system.
Gather Necessary Tools
First, you need to gather all the necessary tools. Having the right tools on hand makes the job easier and quicker.
- Adjustable Wrench – Helps in loosening or tightening connections.
- Pliers – Useful for gripping and turning.
- Towels – To clean up any water spills.
- Bowl or Container – To catch any excess water.
Once you have these tools, you are ready to move on to the next step.
Locate Water Supply
Next, you need to locate the water supply to your RV toilet. This step is crucial for turning off the water properly.
- Find the main water supply valve. It is usually near the back of the toilet or under the sink.
- If unsure, consult your RV’s manual for the exact location.
- Turn the valve clockwise to shut off the water. Make sure it is fully turned off to stop the water flow completely.
With the water supply turned off, you can now proceed to the next steps of your task.
| Tool | Purpose |
|---|---|
| Adjustable Wrench | Loosens or tightens connections |
| Pliers | Grips and turns fittings |
| Towels | Cleans up spills |
| Bowl or Container | Catches excess water |
Following these preparation steps ensures a smooth process of turning off the water to your RV toilet.
Safety Measures
Turning off the water to your RV toilet is a simple task. But safety measures are essential. This ensures you avoid accidents or damage.
Follow these steps to stay safe and protect your RV.
Wear Protective Gear
Always wear gloves and safety glasses. Gloves protect your hands from dirt and chemicals. Safety glasses shield your eyes from water splashes.
These items are easy to find and use. They provide valuable protection.
Ensure Rv Is Stabilized
Make sure your RV is on a flat surface. Use stabilizing jacks if necessary. This prevents any movement while you work.
A stable RV is safer for you and your equipment. It helps you work more efficiently.
Identifying The Shut-off Valve
Turning off the water to your RV toilet is essential for various reasons. Leaks, repairs, or winterizing your RV might require this step. To do this, you need to identify the shut-off valve.
Knowing the type and location of the shut-off valve will make this task easier. Read on to learn about the different types of shut-off valves and common locations in RVs.
Types Of Shut-off Valves
There are two main types of shut-off valves. The first type is the gate valve. This valve uses a wheel or knob that you turn to open or close. The second type is the ball valve. This valve has a lever handle that you turn a quarter turn to operate.
Gate valves are more common in older RV models. Ball valves are often found in newer RVs. Each type has its own advantages. Gate valves are precise and easy to control. Ball valves are quick and easy to operate.
Common Locations In Rvs
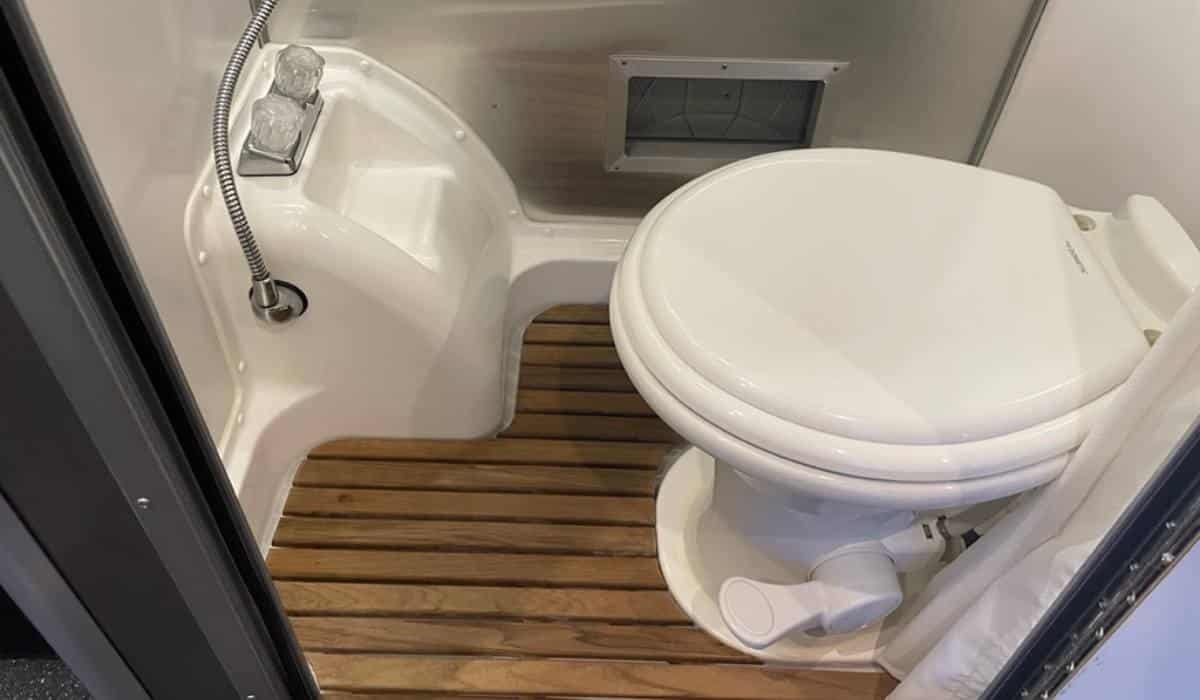
Shut-off valves can be found in several places. The first location to check is behind the toilet. Look for a small valve near the base. You might need to remove a panel to access it.
Another common location is under the bathroom sink. The valve might be near the water supply lines. If you cannot find the valve in these places, check outside the RV. Some models have external access panels for water shut-off valves.
Knowing where to look will save you time and effort. Always keep a flashlight handy. This can help you locate the valve in dark or hard-to-reach areas.

Credit: www.reddit.com
Turning Off The Water Supply
Turning off the water supply to your RV toilet is crucial for maintenance and emergencies. Properly shutting off the water can prevent leaks and water damage. Follow these steps to ensure you do it correctly.
Closing The Valve
First, locate the shut-off valve near the toilet. It is usually a small handle or knob.
- Turn the valve clockwise to close it.
- Make sure it is turned all the way to ensure the water is off.
If you are unsure which valve to close, consult your RV’s manual. It will have a detailed diagram.
Confirming The Water Is Off
After closing the valve, confirm that the water supply is off.
- Flush the toilet to empty the tank.
- Check if water fills the bowl.
- If water still flows, recheck the shut-off valve.
This step ensures there are no leaks or water damage while you work.
Draining Remaining Water
Draining the remaining water from your RV toilet is crucial. This step ensures no water is left to freeze or cause damage. Follow these steps to do it right.
Flushing The Toilet
First, flush the toilet. This will help in draining most of the water. Hold the flush lever down until the bowl is empty. This step ensures that no water remains in the bowl.
Emptying Water Lines
Next, empty the water lines connected to the toilet. Turn off the main water supply to the RV. Then, open all the faucets to let the remaining water drain out. This action will help clear the water from the pipes.
After opening the faucets, disconnect the water line from the toilet. This step ensures that any trapped water is released. Use a small bucket to catch any water that comes out. This will keep your RV clean and dry.
Troubleshooting Issues
Experiencing issues while turning off the water to your RV toilet can be frustrating. These problems often arise due to common malfunctions. Understanding these issues will help you troubleshoot effectively. This guide will assist you in identifying and resolving these problems.
Valve Won’t Turn
If the valve won’t turn, it might be stuck due to mineral buildup. Try using a wrench to gently turn the valve. Be careful not to apply too much force. If the valve is still stuck, consider applying a lubricant. This can help loosen the valve. Check for any visible damage to the valve. If damaged, it may need replacement.
Water Still Running
Sometimes, the water might still run even after turning off the valve. This could mean the valve is not shutting off completely. Inspect the valve for any leaks. Tighten any loose connections. If the issue persists, the valve may be faulty. Replacing the valve could be the solution.
Maintenance Tips
Maintaining your RV toilet is crucial for smooth operation. Simple maintenance tips can extend its life and prevent issues. One key aspect is turning off the water supply. This can avoid leaks and water damage.
Regular Valve Checks
Regularly check the water valve. It ensures the water supply is properly controlled. A faulty valve can cause leaks. Inspect the valve every few months. Look for signs of wear or damage. If you notice any issues, replace the valve immediately. Keeping the valve in good condition saves you from bigger problems.
Preventing Leaks
Leaks can cause serious damage. They waste water and may harm your RV. To prevent leaks, ensure the connections are tight. Use a wrench to secure any loose fittings. Also, check the condition of the hose. Replace it if you find cracks or holes. Regularly cleaning the valve can also prevent leaks. A clean valve works more efficiently and lasts longer.
| Maintenance Task | Frequency |
|---|---|
| Check water valve | Every few months |
| Inspect hose | Monthly |
| Replace damaged parts | As needed |

Credit: www.pinterest.com
When To Call A Professional
Knowing when to call a professional can save time and prevent damage. Some issues with your RV toilet may require more than basic DIY skills. Understanding these situations is crucial for maintaining your RV.
Complex Problems
Some RV toilet issues are too complex for an average person. These problems often involve the plumbing system. If you face such issues, it’s best to call a professional. They have the right tools and knowledge to fix it.
For example, if there is a problem with the main water line, it is not easy to fix. Attempting to fix this without proper skills can lead to more damage. A professional ensures the problem is resolved safely and correctly.
Persistent Leaks
Leaks in the RV toilet can be tricky. If a leak persists even after attempts to fix it, call a professional. Persistent leaks can cause water damage and mold, leading to bigger problems. A professional can identify the root cause of the leak and fix it properly.
Ignoring a persistent leak is risky. It can damage the flooring and other parts of the RV. This can lead to costly repairs. A professional ensures the leak is fixed and prevents further damage.

Credit: www.youtube.com
Frequently Asked Questions
How Do I Shut Off Water To My Rv Toilet?
To shut off the water, locate the water valve behind or near the RV toilet. Turn the valve clockwise until it stops. This will cut off the water supply to the toilet.
Where Is The Rv Toilet Water Shut-off Valve?
The RV toilet water shut-off valve is usually behind or near the base of the toilet. It might be hidden behind a small access panel or cover.
Can I Turn Off The Water To The Rv Toilet Myself?
Yes, you can turn off the water to the RV toilet yourself. Locate the water shut-off valve near the toilet and turn it clockwise.
What Tools Do I Need To Turn Off Rv Toilet Water?
No special tools are needed to turn off the RV toilet water. Simply locate the shut-off valve near the toilet and turn it clockwise by hand.
Conclusion
Turning off the water to your RV toilet is simple. Follow the steps mentioned for a hassle-free process. Ensure you locate the valve and turn it off properly. This prevents leaks and saves water. Regular checks can keep your RV toilet in good condition.


