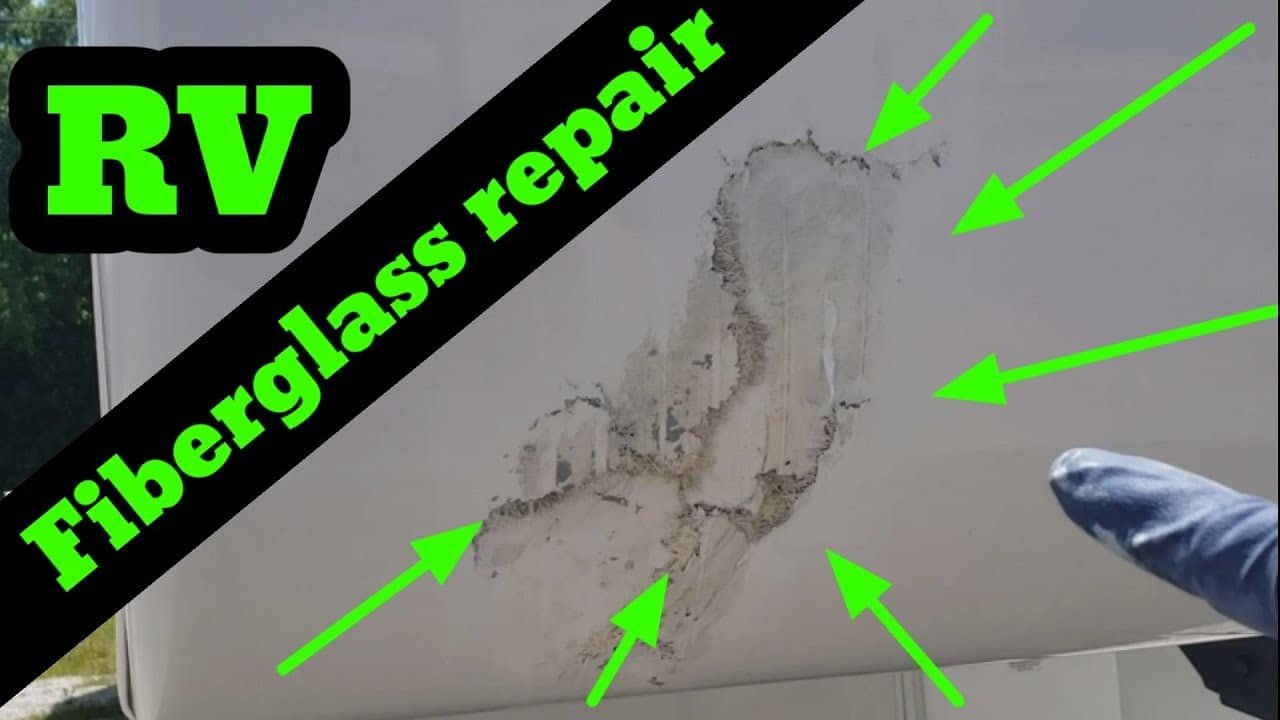
Repairing RV fiberglass exterior damage can seem daunting. But it is a manageable task.
With the right tools and steps, you can fix the damage yourself. Fiberglass is a common material for RV exteriors. It’s lightweight and durable, but it can crack or chip over time. Whether from an accident or wear and tear, exterior damage needs attention.
Fixing it promptly prevents further issues and keeps your RV looking great. This guide will walk you through the process. You’ll learn how to assess the damage, gather materials, and repair the fiberglass. By following these steps, you’ll save money and ensure your RV remains in top condition. Let’s get started on making those repairs!

Credit: www.youtube.com
Assessing The Damage
Before repairing RV fiberglass exterior damage, it’s crucial to assess the damage. This step will help determine the severity and the type of repair needed. Proper assessment ensures you apply the right solution to restore your RV’s appearance and functionality.
Identifying Cracks And Holes
Start by identifying visible cracks and holes. Check the entire exterior surface of your RV. Look for any signs of damage, such as splits, punctures, or gaps. Use a flashlight if necessary. Run your hand along the surface to feel for any hidden cracks.
- Small cracks: Less than 1 inch
- Medium cracks: 1-3 inches
- Large cracks: More than 3 inches
Document each crack and hole. Take pictures and note their locations. This will help you track your repairs and ensure you don’t miss any spots.
Evaluating Structural Integrity
Once you’ve identified the cracks and holes, evaluate the structural integrity. Check if the damage has affected the RV’s frame or internal components. Look for signs of weakness or instability around the damaged areas.
| Type of Damage | Action Required |
|---|---|
| Surface Cracks | Minor repairs |
| Deep Cracks | Possible reinforcement |
| Large Holes | Extensive repairs |
Press gently on the areas surrounding the damage. If the surface gives way or feels soft, there might be underlying issues. In such cases, consider consulting a professional for a thorough inspection.
By carefully assessing the damage, you can ensure a successful repair process. Identifying all issues beforehand will save time and effort.
Gathering Materials And Tools
Repairing RV fiberglass exterior damage can seem daunting. Gathering the right materials and tools is the first step. This step ensures a smooth and effective repair process. Having everything ready before you start saves time and frustration.
Essential Repair Kits
First, get a fiberglass repair kit. These kits contain essential items. They usually include resin, hardener, and fiberglass cloth. Some kits also have mixing containers and stir sticks. These kits simplify the repair process.
Next, get a sandpaper set. Different grits are needed for various stages. Coarse grits remove damaged material. Fine grits smooth the surface. Sandpaper ensures a smooth, even finish.
Another essential is a putty knife. Use it to apply resin and hardener mix. A good quality putty knife makes the job easier. It also ensures an even application.
Safety Equipment
Safety should always come first. Get a good pair of safety goggles. These protect your eyes from dust and debris. Safety goggles are a must-have item.
Wear a dust mask or respirator. This protects your lungs from harmful particles. Fiberglass dust can be harmful. Always wear a mask when sanding or cutting fiberglass.
Finally, get a pair of gloves. Gloves protect your hands from resin and hardener. They also protect from fiberglass splinters. Choose gloves that fit well and are comfortable.
Preparing The Surface
Repairing RV fiberglass exterior damage requires proper surface preparation. This step ensures the repair materials bond well and look seamless. Let’s dive into the steps involved in preparing the surface.
Cleaning The Area
Start by cleaning the damaged area thoroughly. Use water and mild soap to remove dirt and grime. A clean surface allows the repair to stick properly. After washing, rinse the area with clean water. Let it dry completely before moving to the next step.
Sanding For Adhesion
Once the area is clean and dry, it’s time to sand it. Use fine-grit sandpaper to sand the damaged area. Sanding creates a rough surface which helps the repair materials adhere better. Be gentle to avoid further damage. Wipe off any dust with a clean cloth after sanding.
Applying Fiberglass Repair
Fixing RV fiberglass exterior damage involves cleaning the area, sanding the surface, applying fiberglass resin, and allowing it to dry. Sand the repair smooth and finish with matching paint for a seamless look.
Repairing RV fiberglass exterior damage can be a task that requires precision. Applying fiberglass repair is crucial to restore your RV’s look and functionality. This process involves cutting fiberglass patches and mixing resin and hardener. Let’s dive into the steps needed.
Cutting Fiberglass Patches
Start by measuring the damaged area. Ensure you have enough fiberglass cloth. Cut the cloth into patches. Each patch should be slightly larger than the damaged area. This helps cover the damage completely. Use sharp scissors for a clean cut. Lay the patches aside for the next step.
Mixing Resin And Hardener
Now, prepare the resin and hardener. Follow the instructions on the packaging. Usually, it requires a specific ratio. Pour the resin into a mixing container. Add the hardener slowly. Mix thoroughly until it has an even consistency. Be quick, as the mixture can harden fast. Apply the mixture to the patches. By following these steps, you can repair the RV fiberglass exterior. This ensures a smooth and professional finish. Keep your RV looking great and ready for the road.
Smoothing And Shaping
After repairing the fiberglass on your RV, it is vital to smooth and shape the surface. This ensures a flawless finish and helps the new material blend seamlessly with the existing exterior. Proper smoothing and shaping can make a big difference in the final appearance.
Sanding The Repair
Start by sanding the repaired area with coarse sandpaper. This helps to remove any rough edges and high spots. Use a sanding block to keep the surface even. Sand in small, circular motions for the best results. Once the rough areas are smoothed out, switch to finer sandpaper. This will help to further smooth the surface and prepare it for the next steps. Be patient during this process. Proper sanding ensures a smooth and even finish.
Applying Additional Layers
After sanding, inspect the surface for any imperfections. If necessary, apply additional layers of fiberglass or filler. Each layer should be thin and even. Allow each layer to dry completely before sanding again. Repeat this process until the surface is smooth and even. This step is crucial for a professional-looking repair. Proper application of layers ensures durability and a seamless finish.
Finishing Touches
After repairing the fiberglass damage on your RV, the final steps are crucial. These finishing touches make your RV look as good as new. Let’s dive into the key steps to complete the repair process.
Painting The Repaired Area
First, prepare the repaired area for painting. Clean it thoroughly to remove dust and debris. Use a primer to ensure the paint adheres well to the surface. Choose a paint color that matches your RV. Apply the paint in thin, even coats. Allow each coat to dry completely before applying the next. This will help achieve a smooth and uniform finish.
Polishing For A Seamless Look
Once the paint is dry, it’s time to polish. Use a high-quality polish designed for fiberglass surfaces. Apply the polish in circular motions with a soft cloth. This will help blend the repaired area with the rest of the RV. Polishing also adds a protective layer, enhancing the shine and durability. Repeat the process until the surface looks seamless and flawless.
Preventing Future Damage
Preventing future damage to your RV’s fiberglass exterior is crucial. Proper maintenance and protective measures can extend your RV’s lifespan. This section will cover essential tips and techniques to keep your RV in excellent condition.
Regular Maintenance Tips
Regular maintenance is key to preventing further damage. Follow these simple steps:
- Clean your RV regularly: Use mild soap and water to remove dirt and grime.
- Inspect for cracks: Check for any signs of damage, such as cracks or chips.
- Repair promptly: Address any minor damage immediately to prevent it from worsening.
- Check seals and seams: Ensure all seals and seams are intact and not leaking.
Protective Coatings
Applying protective coatings can shield your RV’s fiberglass exterior from damage. Consider the following options:
- Wax your RV: Apply a high-quality wax to protect against UV rays and weather elements.
- Use a fiberglass protectant: These products create a barrier against dirt, grime, and UV damage.
- Apply a clear coat: A clear coat can provide an additional layer of protection and enhance the shine.
By following these tips, you can help prevent future damage to your RV’s fiberglass exterior. Regular maintenance and protective coatings are essential in keeping your RV looking its best.
Credit: www.doityourselfrv.com
When To Seek Professional Help
Maintaining your RV is crucial for a smooth and enjoyable journey. Sometimes, minor repairs can be handled on your own. But certain situations demand professional expertise. Knowing when to seek professional help can save you time and money.
Signs Of Major Damage
Large cracks or holes in the fiberglass indicate severe damage. If the fiberglass feels soft or spongy, it might be a sign of water damage. Bulging or warping of the exterior panels can also signal serious issues. These signs often need expert attention to prevent further damage.
Choosing A Reliable Service
Look for a service with strong reviews and a good reputation. Check if the service is licensed and insured. Ask for estimates and compare them. Visit the shop if possible. Ensure they have experience with RV fiberglass repairs. A reliable service can make a big difference in the quality of the repair.
Credit: www.doityourselfrv.com
Frequently Asked Questions
How Do You Fix Cracks In Rv Fiberglass?
To fix cracks in RV fiberglass, clean the area, sand it, and apply epoxy resin. After it cures, sand it smooth and apply matching gel coat.
What Tools Are Needed To Repair Rv Fiberglass?
You need sandpaper, epoxy resin, a putty knife, gel coat, and a polishing compound to repair RV fiberglass.
Can You Use Bondo On Rv Fiberglass?
Yes, Bondo can be used on RV fiberglass for minor repairs, but it’s not recommended for structural damage.
How Long Does Fiberglass Repair Take?
Fiberglass repair can take a few hours to several days, depending on the extent of the damage and curing time.
Conclusion
Repairing RV fiberglass exterior damage is simple with the right steps. Gather materials, follow the process, and take your time. Clean the damaged area first. Apply the fiberglass repair kit carefully. Sand and paint for a smooth finish. Your RV will look great again.
Regular checks help prevent future damage. Enjoy your travels with a well-maintained RV. Happy and safe adventures await you.


