Understanding how to hook up your RV battery is crucial. It ensures your vehicle runs smoothly.
Whether you’re a seasoned RV enthusiast or a newbie, a clear battery hookup diagram can be a lifesaver. This guide will walk you through the basics of connecting your Fleetwood RV battery. Properly hooking up your battery can prevent many common issues.
It can also extend the life of your RV’s electrical system. You’ll find this information helpful for maintaining your RV’s power setup. Let’s dive into the details and make your next trip worry-free!
Introduction To Fleetwood Rv Battery Hookup
Understanding the Fleetwood RV battery hookup diagram is crucial. It ensures your RV’s electrical system functions correctly. A proper setup guarantees a smooth and enjoyable travel experience. This section will guide you through the basics. Let’s get started.
Importance Of Proper Installation
Proper installation of the RV battery is vital. It ensures the longevity of your battery. It also maximizes the performance of your RV’s electrical components. Incorrect installation can lead to serious issues. For example, it can cause electrical failures or even damage your RV.
Following the correct diagram helps you avoid these problems. It provides a clear path for the installation process. Make sure to double-check connections. Secure all connections tightly. Avoid shortcuts to ensure safety and efficiency.
Safety Precautions
Safety should always be your priority. Working with RV batteries can be dangerous. Wear protective gear like gloves and goggles. They protect you from any accidental spills or sparks.
Disconnect the power before starting any work. This prevents electrical shocks. Always use insulated tools. They minimize the risk of short circuits. Keep the battery area clean and dry. Moisture can lead to corrosion and other issues.
Follow the manufacturer’s guidelines closely. They provide specific instructions for your RV model. Adhering to these guidelines ensures a safe and successful installation.
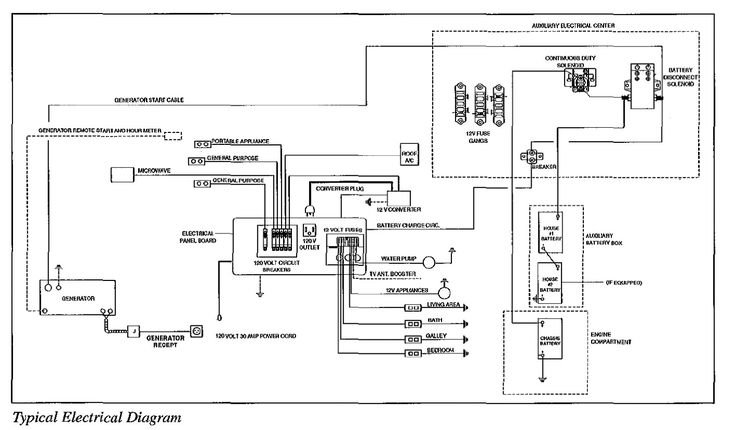
Credit: community.fmca.com
Types Of Rv Batteries
When setting up your Fleetwood RV, understanding the types of RV batteries is crucial. Batteries power various appliances and systems in your RV. Knowing which battery suits your needs can make a big difference in your RV experience.
Lead-acid Batteries
Lead-acid batteries are common in RVs. They are reliable and affordable. They come in two main types: flooded and sealed. Flooded lead-acid batteries need regular maintenance. You have to check water levels often. Sealed lead-acid batteries require less maintenance. They are also safer as they don’t leak acid. Lead-acid batteries have a shorter lifespan. They are also heavier compared to other batteries.
Lithium-ion Batteries
Lithium-ion batteries are becoming popular for RVs. They are lighter and more efficient. These batteries have a longer lifespan. They can also be discharged deeper than lead-acid batteries. This means more usable power. Lithium-ion batteries charge faster. They are also more expensive. However, their benefits often justify the cost. They require less maintenance and are safer. Lithium-ion batteries don’t emit harmful gases.
Tools And Materials Needed
Understanding the tools and materials needed for hooking up a Fleetwood RV battery can make the process smooth and safe. This section outlines the essential tools and required materials to ensure your RV battery installation is successful.
Essential Tools
Having the right tools is crucial for a proper battery hookup. Below is a list of the essential tools you will need:
- Wrench Set: For tightening and loosening bolts and nuts.
- Wire Strippers: To strip the insulation from the wires.
- Multimeter: For measuring voltage, current, and resistance.
- Screwdrivers: Both flathead and Phillips types.
- Battery Terminal Cleaner: To clean the battery terminals effectively.
- Safety Gloves and Goggles: For personal protection during the installation.
Required Materials
In addition to the tools, you will need specific materials to complete the battery hookup. Below is a list of the required materials:
- Batteries: The correct type and size for your Fleetwood RV.
- Battery Cables: Connects the batteries to the RV’s electrical system.
- Battery Terminal Connectors: To secure the battery cables to the terminals.
- Electrical Tape: For insulating wire connections.
- Wire Connectors: To join wires securely.
- Battery Box: To house the batteries safely.
Having these tools and materials ready before you start will save time and ensure a smooth installation process. Make sure to check your RV’s manual for any specific requirements or additional items needed.
Preparing For Installation
Preparing for the installation of a Fleetwood RV battery hookup diagram is crucial. A well-planned setup ensures efficiency and safety. Follow these steps to get ready for a smooth installation process.
Choosing The Right Location
First, find an accessible spot for the battery. It should be easy to reach for maintenance. The location should also be close to the power source. This reduces the length of cables needed. Shorter cables minimize power loss.
Ensuring Proper Ventilation
Proper ventilation is essential for battery safety. Batteries can produce harmful gases. These need to be vented outside the RV. Check the chosen location for adequate airflow. Ensure there are vents or openings nearby.
Install fans if natural airflow is insufficient. Fans help maintain a safe environment. Good ventilation extends the battery’s lifespan. It also keeps the RV interior safe from harmful gases.
Step-by-step Installation Guide
Installing a new battery in your Fleetwood RV doesn’t have to be difficult. Follow this step-by-step installation guide to ensure a smooth process. With clear instructions, you’ll have your new battery hooked up in no time.
Disconnecting The Old Battery
First, turn off all power sources in the RV. This includes lights, appliances, and the main power switch. Safety first.
Next, locate the old battery. It is usually in the engine compartment or a dedicated battery box. Use a wrench to loosen the negative cable first. Remove it from the battery terminal. Then, do the same for the positive cable.
Once both cables are disconnected, carefully remove the old battery. Place it in a safe location for proper disposal. Old batteries can be recycled at many auto parts stores.
Connecting The New Battery
Position the new battery in the same location as the old one. Ensure it is secure and stable. Connect the positive cable to the positive terminal first. Tighten the connection with a wrench.
Next, connect the negative cable to the negative terminal. Make sure both connections are tight and secure. This prevents any loose connections that could cause issues.
Finally, turn on the main power switch and test your RV’s electrical system. Everything should work smoothly. If not, double-check the connections and consult your RV’s manual for troubleshooting tips.
Wiring And Connections
Understanding the wiring and connections of your Fleetwood RV battery is crucial. Proper connections ensure your RV runs smoothly. In this section, we will discuss the key aspects of wiring and connections. Follow these steps to maintain a safe and efficient setup.
Positive And Negative Terminals
The positive and negative terminals are vital in any battery setup. The positive terminal is usually marked with a plus (+) sign. The negative terminal has a minus (-) sign. Connect the positive terminal to the positive cable. Do the same for the negative terminal. This ensures the correct flow of electricity.
Always double-check the markings before connecting the cables. Wrong connections can cause damage to the battery. It can also harm other electrical components in your RV.
Ensuring Secure Connections
Secure connections are essential for your RV battery. Loose connections can lead to power loss. They can also cause sparks and potential hazards. Use a wrench to tighten the connections. Make sure they are firm but not overly tight.
Inspect the connections regularly. Look for signs of corrosion or wear. Clean the terminals with a wire brush if needed. Applying a small amount of petroleum jelly can help prevent corrosion.
Testing The Installation
After you have connected your Fleetwood RV battery, it is crucial to test the installation. Proper testing ensures that your battery operates efficiently. You want to avoid unexpected power issues during your travels. This section covers the necessary steps for testing the installation. Follow these steps to check the voltage levels and verify battery performance.
Checking Voltage Levels
Begin by checking the voltage levels of your RV battery. This step ensures that the battery is charged and ready to use. Use a multimeter to measure the voltage.
- Set the multimeter to DC voltage.
- Connect the red probe to the positive terminal.
- Connect the black probe to the negative terminal.
A fully charged battery should read between 12.6 and 12.8 volts. If the voltage is lower, the battery may need charging.
Verifying Battery Performance
Next, verify the battery performance. This step ensures the battery can handle the RV’s electrical load. Start by turning on various appliances inside your RV.
- Turn on lights.
- Switch on the radio.
- Run the refrigerator.
While the appliances are running, monitor the voltage using the multimeter. The voltage should remain above 12.4 volts. If it drops below this level, the battery may not be able to handle the load.
You can also perform a load test. Use a load tester to apply a specific load to the battery. Monitor the voltage during the test. A healthy battery should maintain a steady voltage.
Regular testing is key to maintaining a reliable power source for your RV. Ensure you carry out these checks periodically.
Maintenance Tips
Ensuring your Fleetwood RV battery stays in top condition is crucial for your adventures. Proper maintenance extends battery life and ensures optimal performance. Below are some maintenance tips for keeping your RV battery in great shape.
Regular Inspections
Regular inspections are essential for maintaining your Fleetwood RV battery. Check the battery terminals and cables for any signs of corrosion or damage. Inspect the battery case for cracks or bulges that might indicate internal damage. Look at the electrolyte levels if you have a lead-acid battery. Keep your battery in peak condition with these steps:
- Check terminals and cables for corrosion or damage.
- Inspect the battery case for cracks or bulges.
- Monitor electrolyte levels in lead-acid batteries.
Cleaning And Upkeep
Cleaning and upkeep help prevent issues with your RV battery. Keep the battery and its connections clean to ensure efficiency. Here’s how to maintain a clean battery:
- Use a mixture of baking soda and water to clean terminals.
- Rinse with water and dry with a clean cloth.
- Apply a thin layer of petroleum jelly to terminals to prevent corrosion.
Regular cleaning keeps your battery working well and helps you spot potential problems early.
Troubleshooting Common Issues
Dealing with a Fleetwood RV battery hookup can be challenging. Understanding common issues and their solutions can make the process easier. This section will guide you through some typical problems and their fixes.
Battery Drain Problems
One common issue RV owners face is battery drain problems. These can occur for several reasons. Here are some frequent causes and solutions:
- Parasitic Loads: Devices like clocks or alarms can slowly drain the battery. Disconnect these when not in use.
- Old Batteries: Batteries lose capacity over time. If your battery is old, consider replacing it.
- Poor Connections: Ensure all connections are tight and clean. Corrosion can lead to poor performance.
Connection Issues
Connection issues can disrupt your RV’s power supply. Here are some steps to troubleshoot and resolve these:
- Check Terminals: Ensure the battery terminals are clean and free of corrosion.
- Inspect Cables: Look for frayed or damaged cables. Replace if necessary.
- Secure Connections: Make sure all connections are tight and secure.
In some cases, a visual inspection might not be enough. Use a multimeter to check the voltage and continuity of the connections. This will help identify any weak spots in the wiring.

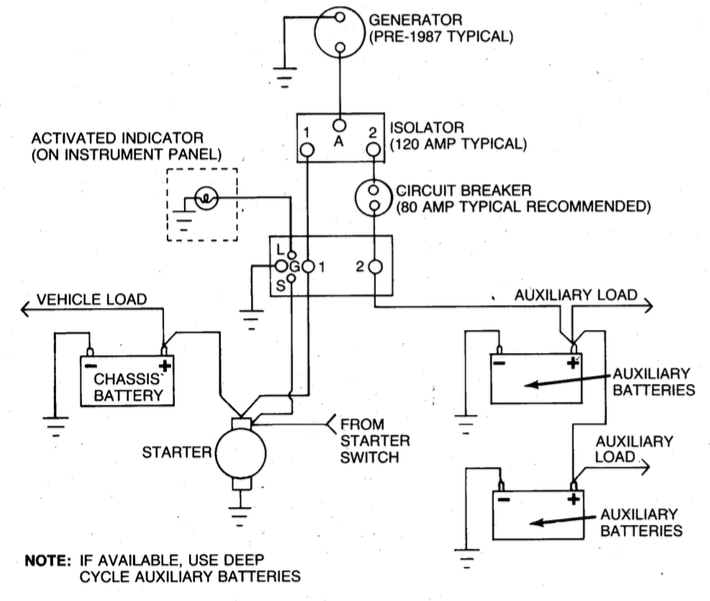
Credit: in.pinterest.com
Frequently Asked Questions
What Is A Fleetwood Rv Battery Hookup Diagram?
A Fleetwood RV battery hookup diagram shows how to connect the batteries in an RV. It helps in understanding the wiring and connections required for efficient power distribution.
How Do I Read A Fleetwood Rv Battery Diagram?
Reading a Fleetwood RV battery diagram involves understanding symbols and connections. Follow the lines to see how batteries connect to the RV’s electrical system.
Where Can I Find A Fleetwood Rv Battery Hookup Diagram?
You can find a Fleetwood RV battery hookup diagram in the RV’s owner manual. Manufacturers’ websites and RV forums are also useful resources.
Why Is A Battery Hookup Diagram Important For Rvs?
A battery hookup diagram ensures proper battery connection, preventing damage and ensuring efficient power usage. It helps in troubleshooting electrical issues in the RV.
Conclusion
Connecting your Fleetwood RV battery correctly ensures safe and efficient power use. Follow the diagram closely. Double-check connections for accuracy. This prevents potential issues. Regularly inspect your battery setup. This helps maintain optimal performance. An organized approach simplifies your RV experience.
Enjoy your adventures with confidence. Proper battery hookup is key.


