Dealing with an RV window leaking between the glass and frame? This issue can cause significant damage if left unchecked.
Water seeping through your RV window can lead to mold, rot, and structural damage. For RV owners, this is a common problem that requires immediate attention. Over time, weather conditions and vibrations can cause seals to deteriorate. When this happens, leaks can occur.
Fixing the leak promptly can prevent costly repairs down the line. In this blog post, we will explore the causes and solutions for RV window leaks. Whether you’re a seasoned RVer or new to the lifestyle, understanding how to handle this issue is crucial. Let’s dive in and protect your RV from unwanted water damage.
Identifying The Leak
Finding the source of a leak in your RV window can be challenging. It’s important to address leaks promptly to prevent further damage. This section will help you identify signs of a leak and understand common causes.
Signs Of A Leak
Leaks can manifest in various ways. Here are some common signs to look for:
- Water Stains: Discoloration on walls or ceilings near the window.
- Soft Spots: Areas around the window frame feeling spongy.
- Mold or Mildew: Presence of mold or musty smell around the window.
- Condensation: Excess moisture between the glass panes.
Common Causes
Understanding the common causes can help you prevent future leaks. Here are some of the main reasons for RV window leaks:
| Cause | Description |
|---|---|
| Seal Failure | Over time, the sealant around the window may degrade, leading to leaks. |
| Frame Damage | Cracks or warping in the window frame can allow water to seep in. |
| Poor Installation | If the window was not installed correctly, gaps can form, causing leaks. |
| Weather Stripping Wear | The weather stripping can wear out, especially in harsh climates, leading to leaks. |

Credit: www.youtube.com
Necessary Tools And Materials
If your RV window is leaking between the glass and frame, you need the right tools and materials to fix it. This section will guide you through the necessary tools and materials to ensure a proper repair. Having the correct items on hand will make the job easier and more efficient.
Essential Tools
- Screwdrivers: Both flathead and Phillips screwdrivers are needed.
- Utility Knife: For cutting and removing old sealant.
- Caulking Gun: Essential for applying new sealant.
- Putty Knife: To help remove old caulk and debris.
- Cleaning Cloths: To clean the area around the window.
- Tape Measure: To measure the window dimensions if needed.
Recommended Materials
- RV Sealant: Specially designed for RV windows to prevent leaks.
- Butyl Tape: Helps create a watertight seal around the window frame.
- Cleaning Solution: For cleaning the window and frame before applying new sealant.
- Protective Gloves: To keep your hands safe during the repair.
- Replacement Screws: In case any screws are damaged or missing.
Having these tools and materials prepared will streamline the repair process. Proper preparation ensures a thorough and effective fix for your RV window leak.
Preparation Steps
Preparing your RV for window leak repair is crucial. Proper preparation ensures a smooth and effective repair process. Follow these steps to get your RV ready for fixing leaks between the glass and frame.
Safety Precautions
Ensure the RV is on a level surface. Engage the parking brake. Turn off all electrical systems. Wear protective gloves and safety goggles. This protects you from sharp edges and debris. Keep a first aid kit nearby.
Cleaning The Area
Remove any dirt and debris from the window area. Use a soft brush or cloth. Apply a mild detergent with water. Gently scrub the area to remove stains and grime. Rinse thoroughly with clean water. Dry the area completely using a lint-free cloth.

Credit: stingysailor.com
Removing The Window
Dealing with an RV window leaking between the glass and frame requires careful attention. Removing the window is a crucial step in fixing this issue. Let’s break down the process into simple steps.
Loosening Screws
First, locate the screws around the window frame. These screws hold the window in place. Use a screwdriver to loosen them. Turn each screw counterclockwise. Be gentle to avoid stripping the screws. Keep the screws in a safe place. You will need them later.
Safely Extracting The Window
After loosening the screws, the window should be free. Gently push the window from the inside. Use even pressure to avoid breaking the glass. If the window sticks, use a putty knife. Slide the knife between the frame and window. Pry gently to loosen any sealant.
Once loose, carefully lift the window out. You may need a helper for larger windows. Place the window on a soft surface. This prevents scratches or damage. Now, the window is ready for inspection and repair.
Sealing The Frame
Addressing an RV window leaking between glass and frame can be daunting. Properly sealing the frame is crucial to fix the issue and prevent further damage. Follow these steps to effectively seal your RV window frame.
Applying Sealant
Begin by choosing a high-quality, RV-specific sealant. Clean the window frame thoroughly. Remove dirt, old sealant, and debris. This ensures a strong bond between the new sealant and the frame.
- Use a caulking gun to apply the sealant.
- Start at one corner of the frame.
- Apply a continuous bead of sealant around the entire frame.
Keep a steady hand to ensure an even application. A uniform bead helps prevent water from seeping through gaps.
Ensuring An Even Spread
After applying the sealant, it is important to spread it evenly. This ensures a watertight seal and prevents future leaks. Use a caulking tool or your finger to smooth the sealant along the frame.
- Apply gentle pressure while smoothing the sealant.
- Ensure the bead spreads evenly and fills any gaps.
- Work in small sections to maintain control.
Allow the sealant to dry completely. This can take several hours or even overnight. Check the manufacturer’s instructions for specific drying times.
Properly sealing the window frame can significantly reduce the risk of leaks. Routine inspections and maintenance can keep your RV in great condition, ensuring a dry and comfortable experience.
Reinstalling The Window
Reinstalling the window on your RV is a crucial step to stop leaks. A proper installation ensures a tight seal. This will protect your RV from water damage. Follow these steps to reinstall your window properly.
Positioning The Window
Start by cleaning the window frame and the glass edges. This helps in better adhesion. Place the window in the frame carefully. Ensure it fits snugly and is aligned correctly.
- Remove any debris or old sealant.
- Use a level to check alignment.
- Hold the window in place while securing it.
Securing Screws
Use the correct screws to secure the window. Make sure they are in good condition. Tighten the screws evenly around the frame. This helps in distributing pressure equally.
- Insert screws in diagonal pairs.
- Do not overtighten to avoid breaking the frame.
- Check for gaps after securing.
Inspect the window after installation. Look for any signs of gaps or misalignment. Fix any issues immediately. This ensures the window is well-sealed and prevents leaks.
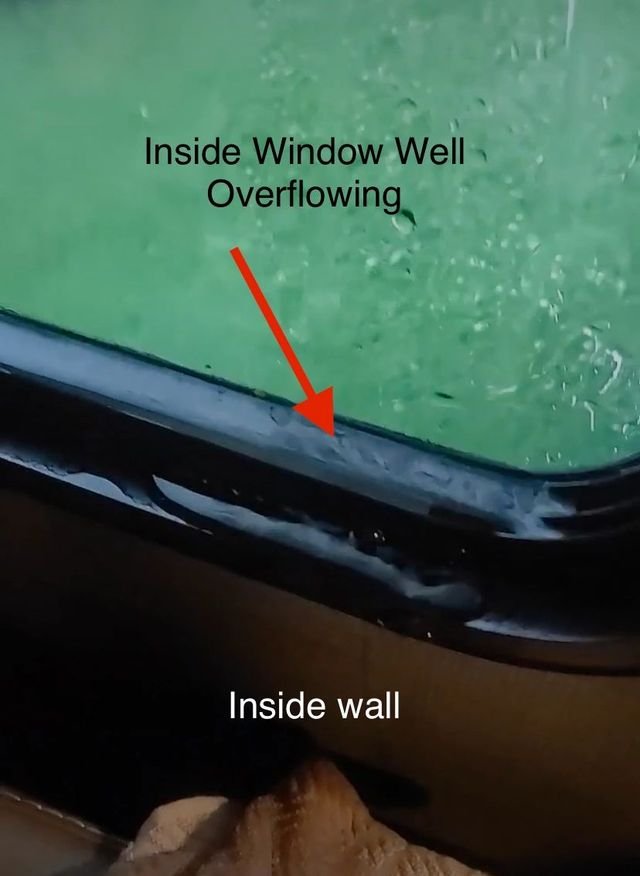
Testing For Leaks
Testing for leaks in your RV window is crucial. It helps prevent damage. Start by identifying where the leak comes from. Focus on the area between the glass and frame. This is a common spot for leaks.
Simulating Rain Conditions
To simulate rain, use a garden hose. Spray water over the window. Aim at different angles. Do this for about 15 minutes. Pay attention to water seeping inside. This can reveal hidden leaks. Dry the window and check again. Repeat if needed.
Inspecting For Gaps
Check the edges of the window frame. Look for visible gaps. Use a flashlight to see better. Small gaps can lead to big leaks. Feel around the frame. Loose seals or missing parts can cause leaks. Ensure the seals are intact.
Use a thin tool. Gently press around the frame. This helps find hidden gaps. Listen for air hissing through gaps. This indicates a leak. Mark any problem areas. Address them quickly to avoid damage.

Credit: www.irv2.com
Maintenance Tips
Maintaining your RV windows is crucial for preventing leaks between the glass and frame. Regular care can help you avoid costly repairs and ensure your RV remains comfortable and dry. Below, we share some essential maintenance tips.
Regular Inspections
Conducting regular inspections of your RV windows is vital. Check for any visible cracks or gaps in the seals. Look closely at the frames and corners. Use a flashlight if necessary. Pay attention to any signs of moisture or condensation between the glass and frame.
Inspect the window seals at least once every three months. Use your hands to feel for any loose or damaged areas. If you find any issues, address them immediately. This simple step can save you from bigger problems later.
Preventive Measures
Taking preventive measures is key to avoiding window leaks. Use the following tips to keep your RV windows in good shape:
- Apply a protective sealant: Use a high-quality sealant around the window frames. This helps to fill any gaps and prevent water from seeping in.
- Keep windows clean: Dirt and debris can damage the seals. Clean your windows regularly with a mild detergent and water.
- Check the window hardware: Ensure that all screws and fasteners are tight. Loose hardware can lead to leaks.
- Use window covers: Protect your windows from harsh weather conditions by using covers when your RV is not in use.
Implementing these maintenance tips can greatly reduce the risk of window leaks in your RV. Regular care and preventive measures will keep your RV dry and comfortable for many adventures to come.
Frequently Asked Questions
Why Is My Rv Window Leaking?
Your RV window might be leaking due to damaged seals, poor installation, or condensation buildup. Regular maintenance can help identify and fix these issues.
How Can I Fix A Leaking Rv Window?
To fix a leaking RV window, inspect the seals and replace damaged ones. Apply a high-quality RV sealant to prevent future leaks.
What Sealant Is Best For Rv Windows?
A high-quality silicone or polyurethane sealant is ideal for RV windows. These sealants are durable, flexible, and weather-resistant.
Can Condensation Cause Rv Window Leaks?
Yes, condensation can cause water to accumulate and leak. Ensure proper ventilation and use dehumidifiers to minimize condensation.
Conclusion
Fixing RV window leaks is crucial for maintaining a dry interior. Regular inspections help catch issues early. Always use quality sealants and tools. Leaks left untreated can cause bigger problems. Swift action saves time and money. Keep your RV in top shape.
Enjoy your travels without worry. A little maintenance goes a long way. Stay proactive and keep your RV windows sealed. Happy and safe adventures await!


