Is your RV water heater leaking from the burner tube? This issue can disrupt your travel plans and comfort.
A leaking water heater in your RV is more than just a minor inconvenience. It can lead to serious damage and costly repairs if not addressed quickly. Understanding the causes and solutions for a burner tube leak is crucial for RV owners.
In this blog post, we will explore why your water heater might be leaking and how to fix it. Whether you’re a seasoned RV enthusiast or a newbie, this guide will help you maintain your water heater and enjoy hassle-free travels. Let’s dive in and keep your RV’s water heater in top shape!

Credit: www.youtube.com
Identifying The Leak
Dealing with a leaking RV water heater can be frustrating. Identifying the source of the leak is the first step. A common culprit is the burner tube. Recognizing the signs early can save you from bigger problems later.
Signs Of A Leaking Burner Tube
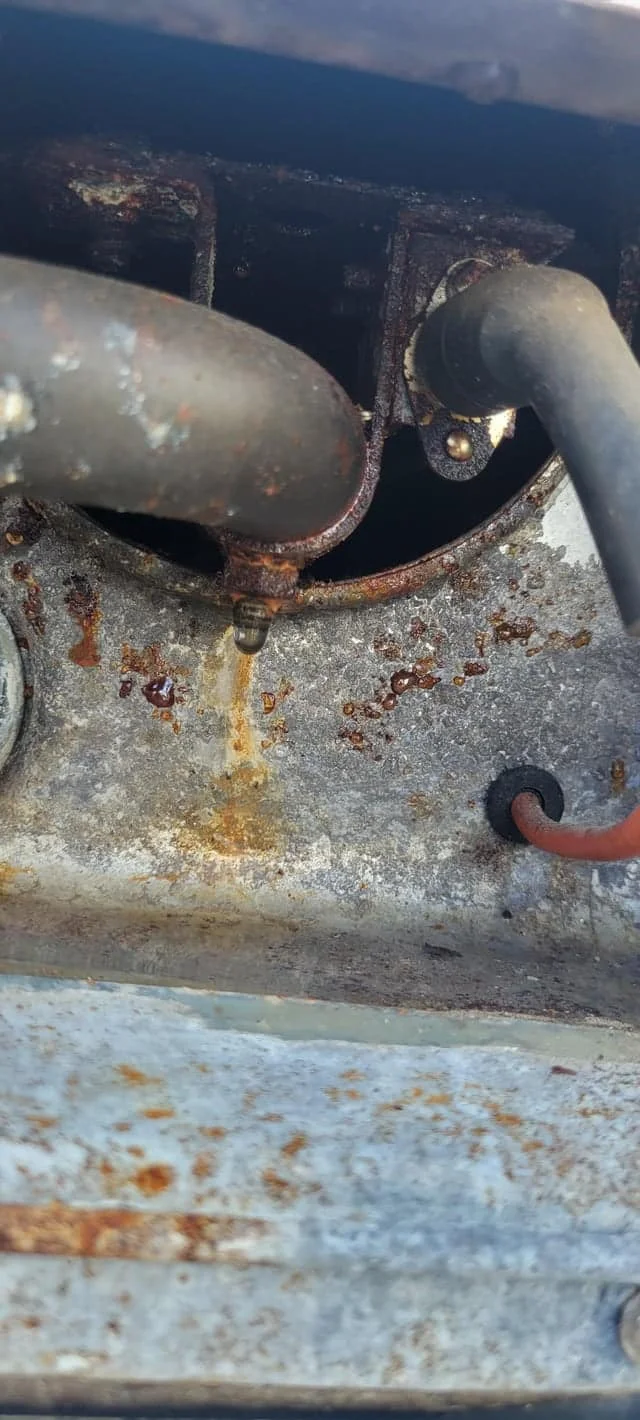
Water around the burner area is a clear sign. If you see rust or corrosion, that’s a red flag. A puddle under the heater also indicates a leak. Listen for hissing sounds. These noises often mean there’s a leak. Another sign is reduced water heating efficiency. This can point to a leak in the burner tube.
Common Causes Of Leaks
Wear and tear is a major cause. Over time, parts degrade. This leads to leaks. Improper installation can also cause issues. If the burner tube is not secured well, it might leak. Another common cause is freezing. Water left in the tube can freeze and expand. This causes cracks and leaks. High water pressure can also damage the burner tube. Always check the pressure levels in your RV.

Credit: bkamericanodyssey.com
Safety Precautions
Water heater leaks can be hazardous. It is essential to take safety precautions. Ensure you follow these steps to protect yourself and your RV.
Turning Off The Water Heater
First, turn off the water heater. Locate the power switch or gas valve. Turn it to the “off” position. This prevents further damage and potential hazards.
Next, turn off the water supply. Find the main water valve and turn it off. This stops more water from entering the system.
Ventilating The Area
Proper ventilation is crucial. Open windows and doors. Allow fresh air to circulate. This reduces the risk of gas buildup.
If you suspect a gas leak, evacuate the area immediately. Contact a professional for help. Do not attempt repairs yourself.
In conclusion, always prioritize safety. Follow these steps to handle a leaking RV water heater safely.
Gathering Necessary Tools
Fixing a leaking RV water heater burner tube can be daunting. But with the right tools, you can handle it with ease. Begin by gathering all the necessary tools to ensure a smooth repair process. This will save time and reduce frustration.
Basic Tools Required
- Screwdrivers: Both flathead and Phillips are essential.
- Adjustable Wrench: Useful for loosening and tightening various nuts and bolts.
- Pliers: Ideal for gripping and holding objects firmly.
- Pipe Wrench: Necessary for working with pipes and fittings.
- Work Gloves: Protect your hands from sharp edges and hot surfaces.
- Safety Goggles: Shield your eyes from debris and hot water.
Optional Tools For Efficiency
While the basic tools are enough, having some additional tools can make the task easier and faster. Consider the following:
| Tool | Purpose |
|---|---|
| Multimeter | Checks electrical connections and ensures safety. |
| Thread Tape | Prevents leaks at threaded joints. |
| Wire Brush | Cleans rust and debris from metal parts. |
| Bucket | Catches water to avoid spills. |
| Flashlight | Illuminates dark or hard-to-reach areas. |
With these tools at hand, you are better prepared to tackle the leak in your RV water heater burner tube. Stay safe and follow proper guidelines during the repair process.
Accessing The Burner Tube
Dealing with an RV water heater leak from the burner tube can be tricky. Accessing the burner tube is the first step in solving this issue. It requires a bit of knowledge and the right tools. This guide will help you through the process.
Locating The Burner Tube
The burner tube is a key part of your RV water heater. First, ensure the water heater is off and cool. Then, find the exterior access panel of your water heater. Open this panel to view the components inside. Look for a metal tube connected to the control valve. This is the burner tube.
Removing Protective Covers
Before you can access the burner tube, you need to remove any protective covers. These covers protect the heater’s internal parts. Use a screwdriver to remove the screws holding the cover in place. Gently lift the cover off and set it aside. Be careful not to damage any wires or connections.
With the cover removed, you can now see the burner tube clearly. Inspect the tube for any signs of damage or leaks. This step is crucial for identifying the problem. Follow these steps to access and inspect the burner tube effectively.
Inspecting The Burner Tube
Discovering a leak in your RV water heater’s burner tube can be stressful. But don’t worry. We will walk you through the necessary steps to inspect the burner tube. This will help you identify and address the issue effectively.
Checking For Visible Damage
Start by turning off the water heater and letting it cool. Safety first. Once it’s cool, locate the burner tube. It’s usually at the bottom of the water heater. Inspect the tube for visible damage.
- Look for cracks or holes in the tube.
- Check for rust or corrosion spots.
- Ensure there are no blockages in the tube.
Visible damage might be the cause of the leak. If you find any, you may need to replace the burner tube.
Assessing The Source Of Leak
Next, you need to determine the exact source of the leak. This can be tricky but is essential. Here are the steps:
- Dry the area around the burner tube completely.
- Turn the water heater back on and observe closely.
- Watch for any drips or moisture forming around the tube.
If the leak is from the burner tube, you will see water dripping from it. If it comes from another part, you need to inspect that part. Use a flashlight for better visibility. Pay attention to small details.
Proper inspection helps you fix the problem effectively and avoid further damage.
Performing The Quick Fix
Dealing with a leaking RV water heater can be stressful. Especially if the leak is from the burner tube. But don’t worry! There are some quick fixes you can perform to stop the leak temporarily. These steps will help you stay dry until you can get a professional repair.
Applying Temporary Sealant
One quick fix is applying a temporary sealant. This method is simple and effective. Here’s how to do it:
- Turn off the water heater and let it cool.
- Clean the area around the leak with a cloth.
- Apply a generous amount of sealant around the burner tube.
- Let the sealant dry according to the instructions on the package.
- Turn the water heater back on and check for leaks.
Using a temporary sealant can give you time to arrange for a permanent fix. Make sure to choose a sealant that is safe for high temperatures and water exposure.
Tightening Loose Connections
Another common cause of leaks is loose connections. Tightening these connections can often stop the leak. Follow these steps to tighten loose connections:
- Turn off the water heater and allow it to cool.
- Identify all the connections around the burner tube.
- Use a wrench to tighten each connection securely.
- Turn the water heater back on and monitor for leaks.
Loose connections are a common issue and can be an easy fix. Make sure not to overtighten, as this can cause damage.
These quick fixes should help you manage a leaking RV water heater temporarily. Always consider seeking professional help for a permanent solution.
Testing The Repair
After fixing the leak in your RV water heater’s burner tube, it’s vital to test the repair. This ensures everything is working correctly and safely. Testing the repair involves reassembling the heater and monitoring for ongoing leaks. These steps help confirm that the issue is resolved.
Reassembling The Heater
Start by carefully putting the heater back together. Ensure all parts are correctly aligned and securely fastened. Double-check connections to avoid any loose fittings. This step is crucial for the heater’s performance and safety.
Reconnect any wires or components you disconnected earlier. Use the manual as a guide if needed. Proper reassembly helps in accurately testing the repair.
Monitoring For Ongoing Leaks
Once reassembled, turn on the water heater. Watch closely for any signs of leaks. Pay attention to the burner tube and surrounding areas. Even small drips can indicate a problem.
Leave the heater running for a while. This helps ensure the repair holds under normal operating conditions. If no leaks appear, your repair is likely successful. If you notice any leaks, recheck your work and tighten any loose connections.
Testing the repair thoroughly helps maintain your RV water heater’s efficiency. It also ensures your safety and comfort on the road.

Credit: bkamericanodyssey.com
Preventive Maintenance Tips
Preventing your RV water heater from leaking requires regular maintenance. By following a few key tips, you can keep your water heater running smoothly. These tips include regular inspections and replacing worn parts.
Regular Inspection Schedule
Create a schedule to inspect your RV water heater. Regular inspections help spot potential issues early. Check the heater every three months. Look for signs of wear or damage. Focus on the burner tube and connections.
- Check for leaks around the burner tube.
- Inspect connections for rust or corrosion.
- Ensure the flame is burning clean and blue.
If you find any issues, address them immediately. Small problems can become big ones fast. Keeping a record of inspections can help track any recurring issues.
Replacing Worn Parts
Replace worn parts promptly to prevent leaks. Parts like seals, gaskets, and the burner tube can wear out over time. Check these parts during your regular inspections.
- Turn off the water heater and let it cool.
- Remove the worn part carefully.
- Install the new part following the manufacturer’s instructions.
- Test the water heater to ensure proper function.
Keeping spare parts on hand can save you time. Replace any damaged parts immediately. This practice helps maintain the efficiency of your water heater.
| Part | Frequency | Notes |
|---|---|---|
| Seals and Gaskets | Annually | Check for cracks and wear. |
| Burner Tube | Every 2 years | Look for rust and corrosion. |
| Connections | Every 6 months | Ensure tight and secure. |
Frequently Asked Questions
Why Is My Rv Water Heater Leaking From The Burner Tube?
A leak from the burner tube is often caused by a faulty pressure relief valve. This valve releases excess pressure to prevent damage. Check for corrosion or debris blocking the valve.
How Do I Fix A Leaking Burner Tube?
First, turn off the water and gas supply. Next, inspect the pressure relief valve for damage. Replace it if necessary, or clean any debris.
Can A Leaking Burner Tube Cause Damage?
Yes, a leaking burner tube can cause significant damage. Water can corrode components and lead to further leaks. Address the issue promptly to avoid costly repairs.
What Tools Are Needed To Fix A Burner Tube Leak?
You’ll need a wrench, replacement pressure relief valve, plumber’s tape, and a bucket. These tools will help you safely fix the leak.
Conclusion
Fixing a leaking RV water heater from the burner tube is crucial. It ensures safe and efficient operation. Regular inspection can prevent bigger issues. Always keep an eye on unusual signs. Address leaks promptly to avoid damage. Basic tools and steps can solve the problem.
Seek professional help if unsure. Proper maintenance extends the heater’s lifespan. Enjoy your RV adventures with peace of mind. Safe travels!


