Getting air out of RV water lines is essential. It ensures your water system works well.
Traveling in an RV offers freedom and adventure. But dealing with air in your water lines can be frustrating. Air bubbles can cause sputtering faucets and irregular water flow. This can disrupt your peaceful journey. Knowing how to remove air from RV water lines is crucial.
It helps maintain a smooth water supply. This guide will show you easy steps to fix this common issue. You’ll learn simple methods to clear air from your RV water lines. Soon, you’ll enjoy a steady water flow again. Let’s dive into the process and keep your RV water system in top shape.
Preparing Your Rv
Preparing your RV is the first step to getting air out of your water lines. Proper preparation ensures a smooth process and helps avoid potential issues. Before starting, make sure your RV is parked on a level surface. This will help in accessing all the necessary components easily.
Gather Necessary Tools
Before you begin, gather all the necessary tools. You will need a wrench, screwdriver, and a bucket. Having everything ready will save you time and effort. Check if you need any special tools for your specific RV model.
Locate Water System Components
Next, locate the water system components in your RV. Identify where the water pump and water heater are. Knowing their locations is crucial. This will help you access them quickly during the process. Consult your RV manual if you are unsure about their locations.
Draining The Water System
Getting air out of RV water lines starts with draining the water system. This process removes trapped air and ensures smooth water flow. Follow these steps for a hassle-free experience.
Turn Off Water Supply
First, turn off the main water supply. This prevents water from flowing while you work. Locate the main valve and turn it clockwise until it stops. Double-check that no water is coming through any faucet.
Open All Faucets
Next, open all faucets in your RV. Start with the highest point, like the shower. Move to lower points, such as the kitchen sink. Opening all faucets allows trapped air to escape. Remember to open both hot and cold faucets. This ensures air is removed from all lines.
Using A Water Pump
Using a water pump is a common method to remove air from RV water lines. This process ensures a steady flow of water without sputtering. Follow these steps to use a water pump effectively.
Activate The Pump
First, turn on the RV water pump. Ensure the water tank has enough water. The pump will start to build pressure in the lines. You may hear a humming sound as it works.
Monitor Air Release
Next, open all faucets in the RV. This includes kitchen, bathroom, and outdoor taps. Let the water flow until you see a steady stream. You might notice sputtering at first. This is normal as the air is being pushed out. Close the faucets one by one once the water runs smoothly.

Credit: www.funkyjunkinteriors.net
Bleeding Air From Faucets
Trapped air in your RV water lines can cause inconsistent water flow. This can lead to annoying sputtering. Bleeding air from faucets is an essential step. It helps ensure smooth water flow throughout your RV. Let’s explore how to do this effectively.
Open Hot And Cold Faucets
Start by turning on all the hot and cold faucets in your RV. This includes faucets in the kitchen, bathroom, and shower. Open them fully to allow any trapped air to escape. You might hear some sputtering sounds at first. This is normal and indicates that air is being released from the lines.
Check For Smooth Water Flow
Monitor the water flow from each faucet. Initially, the flow might be uneven. Wait until the water runs smoothly without any air bubbles. This means the air has been successfully bled out. If the sputtering continues, check other parts of the RV water system for trapped air.
Inspecting Water Lines
Inspecting the water lines in your RV is an essential step to ensure smooth water flow. Air in the lines can cause sputtering faucets and uneven water pressure. Follow these steps to identify and fix the issue.
Look For Air Traps
First, look for air traps in the water lines. Air traps can cause water to flow unevenly. Check for any visible bubbles or gaps. These are often the culprits. Air can get trapped in high points or kinks in the lines.
Use a flashlight to inspect hard-to-see areas. Listen for any unusual sounds in the lines. If you hear gurgling, air is likely present. Make a note of these spots for further inspection.
Ensure Proper Line Connections
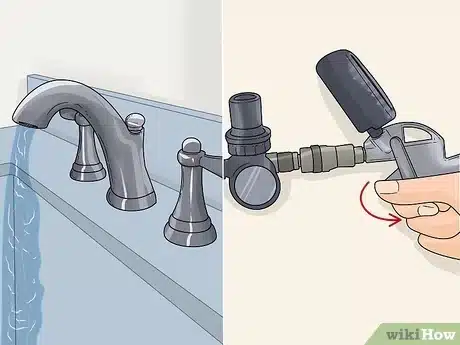
Next, ensure all line connections are secure. Loose connections can allow air to enter. Check the fittings and joints along the water lines. Tighten any loose connections with a wrench.
Inspect the seals and washers for wear and tear. Replace damaged parts immediately. Properly sealed connections prevent air from entering the lines. This step helps maintain smooth water flow.

Credit: www.amazon.com
Utilizing Gravity Fill
Utilizing gravity fill is an effective way to remove air from RV water lines. This method leverages the natural force of gravity to push air out of the system. It is a simple and efficient approach that requires minimal tools and effort.
Fill Freshwater Tank
Start by filling your RV’s freshwater tank to its full capacity. Ensure the tank is clean before filling it with water. This ensures no contaminants enter the water lines.
Use a hose to fill the tank. Make sure the hose is clean and free of debris. Fill the tank slowly to avoid creating air pockets. Monitor the tank’s water level to prevent overfilling.
Allow Gravity To Remove Air
Once the freshwater tank is full, open all the faucets in your RV. This includes both hot and cold water taps. Open them one at a time to let gravity push air out of the lines.
As water flows through the faucets, you may hear sputtering. This indicates air is being expelled. Keep the faucets open until a steady stream of water flows without air bubbles.
Repeat this process for all faucets in the RV. Don’t forget to check the shower and any exterior water outlets.
After all faucets run smoothly, close them one by one. Your RV water lines should now be free of air, ensuring a smooth water flow.
Checking Water Heater
Regular maintenance of your RV’s water heater can help prevent air from getting trapped in the water lines. Ensuring the water heater functions correctly is essential for a smooth water flow. This section will guide you through the steps to check and maintain your RV water heater.
Purge Air From Heater
Air can build up in the water heater, causing inconsistent water flow. Here’s how to purge the air:
- Turn off the water heater and let it cool down.
- Open the pressure relief valve to release any trapped air.
- Close the valve once water starts flowing steadily.
Perform this task regularly to ensure the water heater works efficiently.
Secure Water Heater Connections
Loose connections can allow air into the water lines. To secure the connections:
- Inspect all water heater connections for any signs of leaks or looseness.
- Tighten any loose connections using a wrench.
- Replace any damaged or worn-out parts immediately.
Properly securing the connections helps maintain a steady water flow and prevents air from entering the system.
Credit: www.funkyjunkinteriors.net
Final System Check
After completing all the previous steps to get the air out of your RV water lines, it’s crucial to perform a final system check. This ensures that your water system is working correctly and that no air remains in the lines. A thorough final check helps avoid future issues and keeps your RV water system in perfect condition.
Run Water Through All Faucets
Start by running water through all the faucets in your RV. Turn on each faucet one by one. Let the water run for a few minutes. This helps push out any remaining air pockets. Pay attention to each faucet’s flow. If you notice sputtering, let it run until the water flows smoothly.
Ensure Air-free Water Flow
Check that the water flow is steady and continuous. If you find any air bubbles or sputtering, let the faucet run longer. Ensure that every faucet and water outlet in your RV is tested. This includes kitchen sinks, bathroom sinks, showers, and outdoor taps.
By running water through all faucets and ensuring air-free water flow, you confirm that your RV water system is clear of air. This step is essential for a well-functioning water system in your RV.
Frequently Asked Questions
How Do I Remove Air From Rv Water Lines?
To remove air from RV water lines, open all faucets. Start from the farthest faucet and work towards the nearest. Let water run until air is expelled.
Why Is Air In Rv Water Lines A Problem?
Air in RV water lines can cause sputtering faucets and uneven water flow. It may also affect water pressure and cause annoying noises.
Can Air In Water Lines Damage Rv Appliances?
Yes, air in water lines can damage RV appliances. It can cause inconsistent water flow, leading to potential damage over time.
How Often Should I Bleed Rv Water Lines?
You should bleed RV water lines at the start of each trip. Also, do it after any maintenance involving water lines.
Conclusion
Clearing air from RV water lines can seem challenging. But it’s manageable. Follow the steps carefully. Check all connections. Use a water pump if needed. Repeat if air remains. Regular maintenance prevents issues. Enjoy a smooth water flow. Happy RV travels!


