RV air conditioners are essential for a comfortable trip. Sometimes, they drip water outside.
Wondering why? This common issue can be puzzling. Water dripping from your RV air conditioner is usually normal. It means condensation is forming and draining as it should. But, excessive dripping can signal a problem. Understanding the cause is important.
It could be due to a clogged drain, a dirty filter, or even a low refrigerant level. Addressing these issues early can prevent bigger problems. Let’s explore the common causes and solutions for an RV air conditioner dripping water outside. This will help you maintain a cool, dry environment inside your RV. Keep reading to learn more and ensure a pleasant RV experience.
Common Causes
Experiencing your RV air conditioner dripping water outside can be frustrating. There are several common causes for this issue. Understanding these causes can help you fix the problem quickly. Below, we explore two major causes: clogged drain pipe and damaged seals.
Clogged Drain Pipe
A clogged drain pipe can cause water to drip outside your RV. This pipe helps remove condensation from the air conditioner. If it gets blocked, water has nowhere to go. It will start to drip outside instead. Check the drain pipe regularly.
- Remove any debris from the pipe
- Ensure it is not bent or damaged
- Use a pipe cleaner to clear any blockages
Regular maintenance can prevent clogs. This keeps your air conditioner working efficiently.
Damaged Seals
Damaged seals around your RV air conditioner can also cause water leaks. These seals keep water out of the RV. If they are cracked or worn, water can escape. Inspect the seals around your air conditioner unit.
- Look for any visible cracks or damage
- Replace any damaged seals immediately
- Use a high-quality sealant for repairs
Maintaining these seals can prevent water from leaking outside. It also protects the interior of your RV.
By addressing these common causes, you can stop your RV air conditioner from dripping water outside. Regular checks and maintenance are key.
Immediate Solutions
Is your RV air conditioner dripping water outside? It can be a common issue, but there are immediate solutions to fix this problem. By taking quick action, you can ensure your RV stays dry and comfortable. Let’s explore some effective methods.
Cleaning The Drain Pipe
A clogged drain pipe is a common reason for water dripping outside. Over time, dirt and debris can block the pipe. This prevents proper water flow.
To clean the drain pipe, follow these steps:
- Turn off the air conditioner.
- Locate the drain pipe.
- Remove any visible debris.
- Use a small brush to clean inside the pipe.
- Flush the pipe with water to remove any remaining blockages.
Regular cleaning ensures water flows freely, reducing the chance of leaks.
Sealing Leaks
Leaks around the air conditioner can cause water to drip outside. Inspect the unit for any cracks or gaps. Sealing these leaks can prevent water from escaping.
To seal leaks, you will need:
- Silicone sealant
- A caulking gun
- A clean cloth
Follow these steps to seal the leaks:
- Turn off the air conditioner.
- Clean the area around the leak with a cloth.
- Apply silicone sealant to the cracks or gaps.
- Use the caulking gun for an even application.
- Allow the sealant to dry completely before turning the unit back on.
Sealing leaks can help maintain your RV’s interior comfort.
Preventive Measures
Preventive Measures are essential to keep your RV air conditioner working efficiently. Regular upkeep can help prevent water from dripping outside. It also extends the lifespan of your unit. Here are some key steps to consider.
Regular Maintenance
Regular maintenance is vital for any RV air conditioner. Cleaning filters and coils helps in smooth operation. A dirty filter can cause the system to work harder, leading to water leakage.
- Clean filters every month.
- Remove dust and debris from coils.
- Check for any visible signs of wear and tear.
Following these steps can reduce the chances of water dripping outside your RV.
Routine Inspections
Conducting routine inspections can help you catch issues early. It is easier to fix small problems before they become big ones. Here are some tips for effective inspections:
- Check Drainage System: Ensure the drainage system is not blocked. A blocked system can cause water to overflow.
- Inspect Seals: Check the seals around the air conditioner. Make sure they are tight and not damaged.
- Look for Leaks: Inspect the unit for any signs of leaks. Fixing them early can prevent larger issues.
Routine inspections can save you time and money in the long run.
Following these preventive measures will help maintain your RV air conditioner. It will also keep your travels comfortable and stress-free.
Credit: www.reddit.com
Tools Needed
Maintaining your RV air conditioner is essential. Dripping water outside can indicate a problem. To fix this, gather the right tools. Proper tools make the job easier and ensure a thorough repair.
Basic Cleaning Supplies
First, you need basic cleaning supplies. Get a soft cloth and a mild detergent. A small brush helps to remove debris. Having a bucket of warm water is useful. Keep these items handy to clean the air conditioner parts.
Sealant And Adhesives
Sealing leaks prevents water from dripping. Use a high-quality sealant. Silicone-based sealants work best. You will also need adhesive tape. This helps secure loose parts. Make sure the sealant and adhesives are weatherproof.
Step-by-step Guide
Experiencing your RV air conditioner dripping water outside can be alarming. This guide will walk you through fixing the issue step-by-step. Follow these instructions for a hassle-free repair process.
Shutting Off Power
Safety first. Turn off the power to your RV air conditioner. Locate the circuit breaker panel and switch off the circuit for the AC unit. This will prevent any electric shocks.
Accessing The Unit
Next, you need to access the air conditioning unit. Climb onto the roof of your RV carefully. You will see the AC unit cover secured with screws. Use a screwdriver to remove these screws and lift the cover off.
Once the cover is off, you can inspect the inside of the unit. Look for any visible blockages or water accumulation. This is where the water is likely coming from.
To make the inspection easier, you might want to follow these steps:
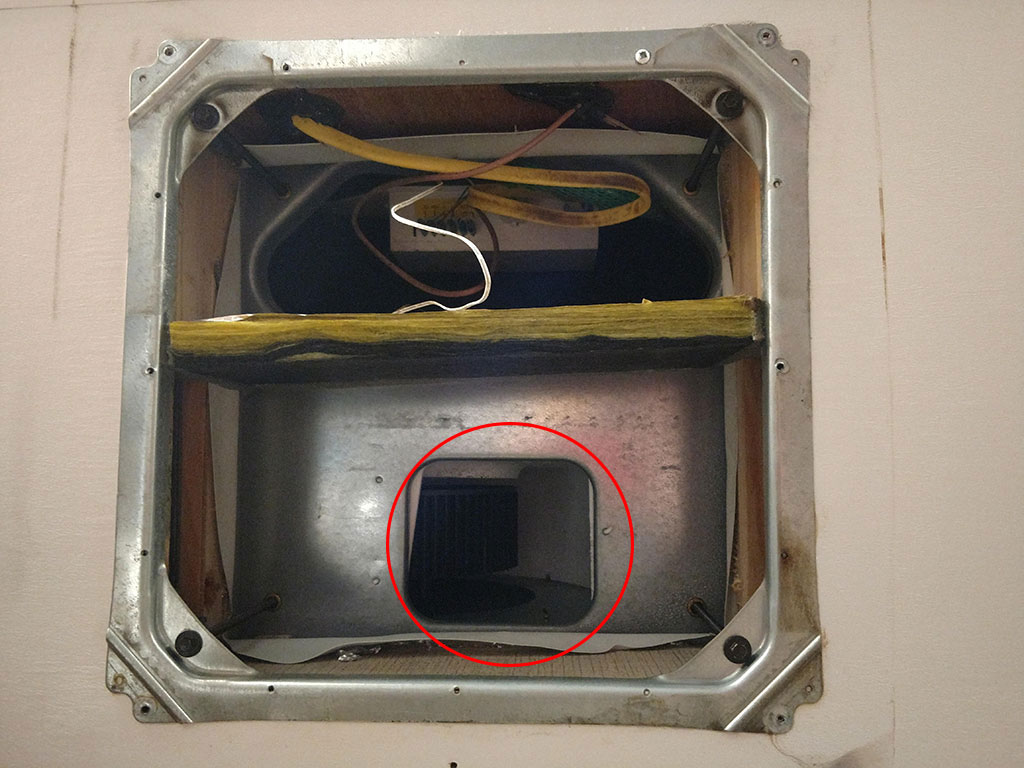
- Check the drain pan for any standing water.
- Examine the drain line for clogs.
- Inspect the coils for dirt or ice buildup.
After identifying the issue, proceed to clean or clear any blockages. Use a soft brush or compressed air to clean the coils. Ensure the drain line is free of debris by using a flexible brush or vacuum.
Credit: community.goodsam.com
Long-term Fixes
Is your RV air conditioner dripping water outside? It can be frustrating. This issue often requires long-term fixes. Taking action can prevent future problems. Let’s explore some effective solutions.
Upgrading Components
Sometimes, older parts wear out. Upgrading components can help. Consider replacing the drain pan. A new pan can prevent leaks. Also, check the seals. Worn seals may need replacement. This ensures proper water flow. Proper insulation is crucial too. It stops condensation buildup.
Professional Servicing
A professional technician can diagnose issues. They have the right tools. Regular servicing keeps your AC in top shape. Technicians clean the system thoroughly. They remove any blockages. They also check for damaged parts. Their expertise ensures a long-lasting fix.
Safety Precautions
When dealing with an RV air conditioner dripping water outside, it’s vital to follow safety precautions. Ensuring your safety while performing maintenance tasks can prevent accidents and injuries. Here, we will discuss some essential safety measures you should take.
Wearing Protective Gear
Before beginning any maintenance on your RV air conditioner, put on the right protective gear. This includes:
- Gloves to protect your hands from sharp edges.
- Safety goggles to guard your eyes from debris.
- Non-slip shoes to prevent falls, especially when working on the roof.
Wearing these items can help you avoid injury and work more safely.
Avoiding Electrical Hazards
Working with electrical appliances can be dangerous. Follow these steps to avoid electrical hazards:
- Turn off the power to the air conditioner before starting any work.
- Use a multimeter to ensure there is no remaining electrical charge.
- Inspect power cords and connections for any damage or wear.
By taking these steps, you can reduce the risk of electrical shock or damage to your RV.

Credit: www.youtube.com
Faqs
Many RV owners face the issue of their air conditioner dripping water outside. This can raise a lot of questions. Below are answers to some frequently asked questions about this problem.
How Often To Clean?
Cleaning your RV air conditioner is essential. Do it every few months. Dust and debris can clog the system. This leads to water dripping outside. Regular cleaning prevents this issue.
Use a soft brush to remove dust. Clean the filters too. This ensures smooth operation. A clean unit works better and drips less water.
What If The Problem Persists?
If cleaning does not help, check the drain pan. It might be clogged. Clear any blockages. This allows water to flow out properly. Ensure the drain hose is not kinked. A kinked hose stops water from draining.
If the problem continues, seek professional help. A technician can inspect the unit. They might find issues you missed. Professional maintenance can solve persistent problems.
Frequently Asked Questions
Why Is My Rv Air Conditioner Dripping Water Outside?
Your RV air conditioner drips water outside because of condensation. This is normal as the unit removes humidity from the air inside.
How Can I Stop My Rv Ac From Leaking Water?
To stop your RV AC from leaking, ensure the drain pan is not clogged. Regular maintenance helps prevent leaks.
Is It Normal For Rv Ac To Drip Water?
Yes, it is normal for an RV AC to drip water outside. This indicates proper functioning and condensation removal.
Can A Clogged Drain Cause Rv Ac Water Leaks?
Yes, a clogged drain can cause water leaks in your RV AC. Regularly check and clean the drain to prevent this issue.
Conclusion
Fixing your RV air conditioner dripping water outside is easy. Regular checks can help you avoid this problem. Clean the filters often. Make sure the drain pan is clear. Ensure your RV is level. Small steps can make a big difference.
Enjoy cool air without the mess. Happy travels with your well-maintained RV!


