Is your RV water heater pilot not lighting? This can be a frustrating issue for many RV owners.
Without a working pilot light, you may find yourself without hot water during your travels. Understanding the reasons behind this problem is crucial. Your RV water heater pilot might not light due to various issues. It could be a simple fix or something that needs professional attention.
In this blog post, we will explore common reasons why your RV water heater pilot won’t light and provide practical solutions. Our goal is to help you diagnose and fix the problem, so you can enjoy hot water on your journeys again. Let’s dive in and get that pilot light burning bright!

Credit: www.cardiangra.com
Common Causes
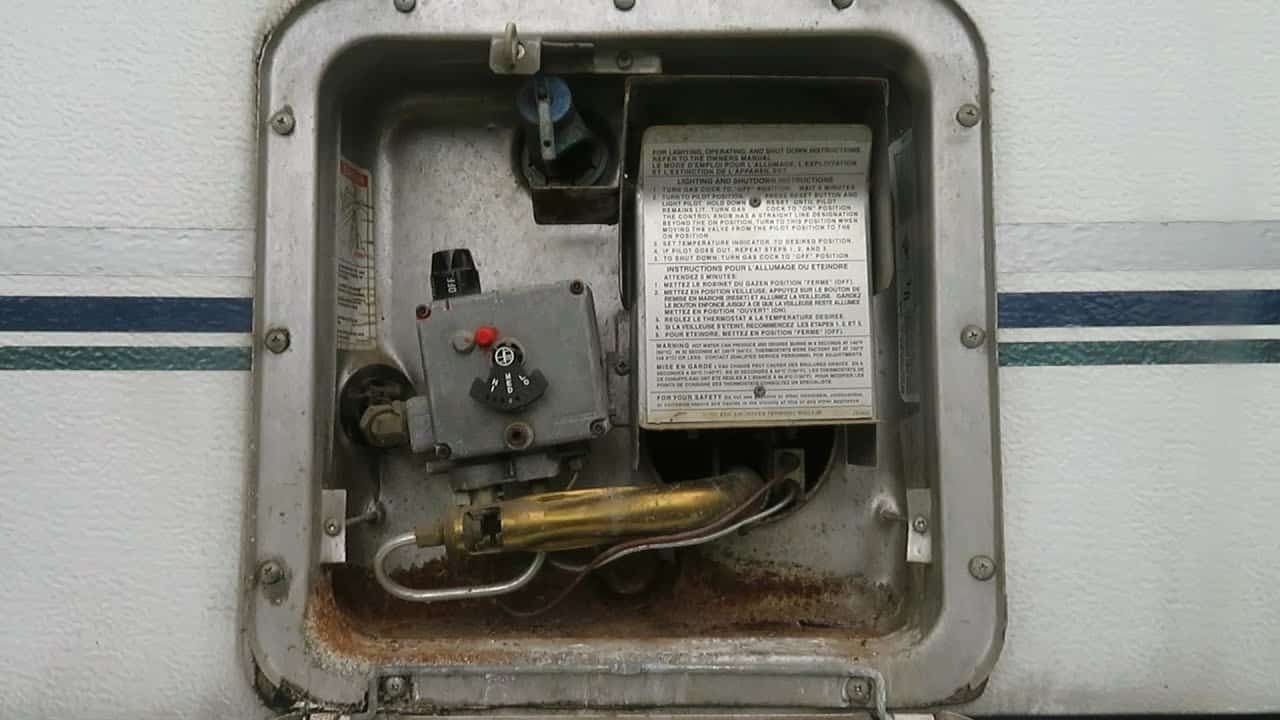
If your RV water heater pilot won’t light, understanding the common causes can help you troubleshoot and fix the issue. Here, we will discuss two main problems: gas supply issues and pilot orifice blockage. Knowing these can save time and frustration.
Gas Supply Issues
A common reason for the pilot light not igniting is gas supply issues. Ensure the propane tank is full. Check the gas line for kinks or damage. Look for any shut-off valves that may be closed. A disruption in gas flow can prevent the pilot from lighting.
- Propane tank level: Check and refill if needed.
- Gas line: Inspect for kinks, cracks, or leaks.
- Shut-off valves: Ensure they are open.
Pilot Orifice Blockage
A pilot orifice blockage can also cause the pilot light to fail. Dirt or debris can clog the orifice, stopping gas flow. Clean the orifice using a thin wire or needle. This can restore proper gas flow and light the pilot.
- Turn off the gas supply.
- Remove the pilot assembly.
- Clean the orifice with a thin wire or needle.
- Reassemble and test the pilot light.
Regular maintenance can prevent blockages. Check and clean the orifice periodically. This ensures smooth operation and prevents issues.
Credit: www.reddit.com
Safety Precautions
When dealing with an RV water heater pilot that won’t light, safety is paramount. Before troubleshooting, ensure you follow these essential safety precautions. This will protect you and your RV from potential hazards.
Turn Off Gas Supply
Before inspecting or repairing the water heater, turn off the gas supply. Locate the gas valve and switch it to the “off” position. This will prevent gas leaks and reduce the risk of fire.
- Find the gas valve near the water heater.
- Switch the valve to “off”.
- Ensure no gas is flowing to the heater.
Ventilation Measures
Proper ventilation is crucial when working with gas appliances. Ensure the area around the water heater is well-ventilated. This helps to disperse any gas that may escape during troubleshooting.
- Open windows and doors near the heater.
- Use a fan to circulate air.
- Keep flammable materials away from the heater.
| Step | Action |
|---|---|
| 1 | Turn off the gas supply |
| 2 | Ensure proper ventilation |
Following these safety precautions will ensure a safe environment for troubleshooting your RV water heater.
Inspecting Gas Supply
Is your RV water heater pilot not lighting? The problem could be with the gas supply. To ensure everything is working smoothly, inspect the gas supply thoroughly. Let’s break it down into two key steps: checking the propane level and inspecting the gas line. Follow these steps to get your water heater back on track.
Checking Propane Level
The first step is to check the propane level in your tank. Low propane can cause the pilot light not to ignite. Locate your propane tank and check the gauge. Ensure it has enough gas. If the level is low, refill the tank. Propane is essential for the heater to function. Without it, the pilot light will not stay lit.
Inspecting Gas Line
Next, inspect the gas line for any issues. A blocked or damaged gas line can prevent gas from reaching the pilot. Start by turning off the propane supply. Then, visually inspect the gas line for cracks or leaks. If you find any damage, replace the gas line immediately. Also, ensure there are no obstructions blocking the gas flow.
Reconnect the gas line securely. Turn the propane supply back on. Listen for any hissing sounds, which could indicate a leak. Use a soap and water solution to check for leaks. Bubbles will form if there is a leak. Fix any leaks before attempting to relight the pilot.
Cleaning The Pilot Orifice
Is your RV water heater pilot not lighting? Cleaning the pilot orifice might help. Dirt or debris can clog the orifice. This prevents gas flow. Cleaning it ensures the pilot lights up.
Tools Required
- Adjustable wrench
- Compressed air can
- Small brush
- Needle or thin wire
- Safety gloves
- Protective goggles
Step-by-step Guide
First, turn off the gas supply. Ensure the heater is cool. Wear safety gloves and goggles.
Next, locate the pilot orifice. Use the adjustable wrench to remove it. Be gentle to avoid damage.
Use the needle or thin wire to clear any clogs. Be careful. Do not enlarge the opening.
Blow compressed air through the orifice. This removes any remaining debris.
Then, use the small brush to clean around the area. Ensure it is spotless.
Reattach the pilot orifice. Tighten it with the wrench. Do not overtighten.
Finally, turn on the gas supply. Test the pilot light. It should light up now.
Thermocouple Issues
One common issue with RV water heaters is the pilot light not igniting. Often, the problem lies with the thermocouple. The thermocouple is a safety device. It senses the pilot flame and keeps the gas valve open. If it malfunctions, your pilot won’t light.
Thermocouple Testing
First, inspect the thermocouple for dirt or damage. Clean it with a fine sandpaper. Next, use a multimeter to test it. Set the multimeter to millivolts. Heat the thermocouple’s tip with a lighter. The reading should be between 25 to 30 millivolts. If it’s lower, the thermocouple is faulty.
Thermocouple Replacement
If the thermocouple is bad, you need to replace it. Turn off the gas supply first. Then, unscrew the old thermocouple from the gas valve. Install the new thermocouple. Make sure it is properly aligned with the pilot flame. Tighten the connections securely. Finally, turn the gas back on and test the pilot light again.

Credit: www.youtube.com
Igniter Problems
Igniter problems in RV water heaters can be frustrating. If the pilot won’t light, the igniter might be the culprit. Understanding the igniter’s role can help in solving the issue.
Spark Igniter Inspection
The first step is to inspect the spark igniter. Look for any visible damage.
- Check for cracks or breaks.
- Ensure the wires are connected properly.
- Look for any corrosion.
Use a multimeter to test for continuity. No continuity means the igniter is faulty. Replace it.
Replacing The Igniter
If the igniter is faulty, replacing it is necessary. Here’s how:
- Turn off the gas and power supply.
- Remove the old igniter. Note how it’s connected.
- Install the new igniter. Follow the same connections.
- Turn the gas and power back on.
- Test the new igniter to ensure it works.
Follow these steps carefully. Your RV water heater should work properly again.
Control Valve Troubles
Control valve troubles can be a major cause of your RV water heater pilot not lighting. A faulty control valve can disrupt the gas flow. This can prevent the pilot light from igniting. Below, we will discuss how to test and replace the control valve to fix this issue.
Testing Control Valve
First, ensure the gas supply is turned off. Locate the control valve on your RV water heater. Disconnect the gas line from the control valve. Use a multimeter to test for continuity. This will show if the valve is functioning correctly. If there’s no continuity, the control valve is likely faulty. This means it needs to be replaced.
Replacing Control Valve
Begin by turning off the gas supply. Remove the old control valve by unscrewing it from the heater. Install the new control valve by screwing it into place. Ensure it is tightly secured. Reconnect the gas line. Turn the gas supply back on. Check for gas leaks by applying soapy water to the connections. If no bubbles form, the installation is successful. Test the water heater to see if the pilot light ignites. If it does, the replacement was successful.
Maintenance Tips
Regular maintenance can prevent your RV water heater pilot light from failing. Follow these tips to keep it in good working order. This ensures you have hot water when needed.
Regular Cleaning
Keeping your RV water heater clean is crucial. Dust and debris can block the pilot light. Clean the unit every few months.
- Turn off the gas and water supply.
- Remove the access panel.
- Use a brush to clean the burner area.
- Check for any blockages in the pilot tube.
Regular cleaning keeps your water heater efficient. It also prevents pilot light issues.
Annual Professional Inspection
Schedule an annual inspection with a professional. They can detect problems early. This prolongs the life of your water heater.
- Check gas connections for leaks.
- Inspect the thermocouple for damage.
- Ensure the burner is functioning properly.
Annual inspections help maintain safety and efficiency. They also ensure your pilot light works properly.
Frequently Asked Questions
Why Won’t My Rv Water Heater Pilot Light?
Your RV water heater pilot won’t light due to issues like a faulty thermocouple, gas supply problems, or a dirty pilot tube. Check these components for damage or obstruction. Regular maintenance helps.
How Do I Fix My Rv Water Heater Pilot?
To fix your RV water heater pilot, clean the pilot tube, check the thermocouple, and ensure the gas supply is intact. If issues persist, consult a professional for a thorough inspection and repair.
What Causes Rv Water Heater Pilot Issues?
RV water heater pilot issues are often caused by dirt in the pilot tube, a malfunctioning thermocouple, or gas supply problems. Regular maintenance and cleaning can prevent these problems.
Can I Light My Rv Water Heater Pilot Manually?
Yes, you can light your RV water heater pilot manually. Follow the manufacturer’s instructions for safe manual lighting. Always ensure proper ventilation and safety precautions when handling gas appliances.
Conclusion
Fixing an RV water heater pilot light can be straightforward. Check the gas supply first. Ensure there are no blockages. Clean the pilot tube. Use a match or lighter safely. If it still won’t light, consult a professional. Regular maintenance prevents future issues.
Remember, safety is crucial. Keep your RV adventures warm and comfortable.


