Building a small septic tank for your RV can seem challenging. But with the right guidance, it’s entirely doable.
RV enthusiasts often face the issue of waste disposal. A small septic tank is a practical solution. It helps manage waste efficiently, especially when you’re off the grid. This blog post will guide you through the process. You’ll learn the basics and find simple steps to build your own septic tank.
It’s easier than you think and can save you a lot of trouble. So, let’s dive into how you can create a reliable septic system for your RV.
Planning Your Septic Tank
Building a small septic tank for your RV requires proper planning. The right plan ensures functionality and longevity. This section covers the essentials for planning your septic tank.
Choosing The Right Location
Choosing the right location is crucial. It affects the efficiency and safety of your septic system. Consider these key factors:
- Distance from RV: Place the tank close to the RV to minimize pipe length.
- Soil Type: Ensure the soil has good drainage properties.
- Water Sources: Keep the tank away from water sources to prevent contamination.
- Accessibility: Ensure the tank is accessible for maintenance and pumping.
Determining The Tank Size
The tank size depends on the number of users and frequency of use. Follow these steps to determine the right size:
- Estimate Waste: Calculate the daily waste generated by the RV occupants. A typical estimate is 50 gallons per person per day.
- Choose Tank Capacity: Based on the daily waste estimate, choose a tank that can hold at least three days of waste. For instance, a family of four might need a 600-gallon tank.
Use this table to help determine your tank size:
| Number of People | Daily Waste (gallons) | Recommended Tank Size (gallons) |
|---|---|---|
| 1-2 | 50-100 | 300 |
| 3-4 | 150-200 | 600 |
| 5-6 | 250-300 | 900 |
Proper planning ensures your septic tank serves your needs effectively. Choose the right location and size for best results.

Credit: www.wikihow.com
Gathering Materials
Before you start building a small septic tank for your RV, you need to gather all necessary materials. This is a crucial step. Without the right tools and construction materials, your project may face delays or complications. Let’s break down what you need.
Essential Tools And Equipment
First, gather your tools and equipment. You will need a shovel. This is for digging the hole where the septic tank will sit. A level is also important. It ensures your tank is even. A hacksaw will be useful for cutting pipes. A measuring tape helps in accurate measurements. You might also need a wheelbarrow. This is for moving dirt and materials.
Necessary Construction Materials
Now, focus on the construction materials. PVC pipes are essential. You need these for the inlet and outlet connections. Purchase a septic tank that fits your size requirements. Gravel is needed for the drainage field. You also need concrete blocks. These will support the tank. Don’t forget the PVC cement. This will seal the pipe connections. Lastly, get a septic tank riser. This allows easy access for maintenance.
Preparing The Site
Select a suitable location for the septic tank. Ensure the ground is level and has good drainage. Clear away any debris or obstacles.
Building a small septic tank for your RV starts with preparing the site. Proper preparation ensures the septic tank functions well. Begin by selecting a flat area for the tank. Ensure this area is away from water sources and your RV. Safety and functionality should be your top priorities.
Marking The Digging Area
First, mark the area where you will dig. Use spray paint or stakes and string. Clearly outline the septic tank’s dimensions. This helps you dig accurately and avoids mistakes. Make sure the marked area is large enough for the tank.
Excavating The Ground
Next, start excavating the ground. Use a shovel for small projects. For larger tanks, consider renting a mini-excavator. Dig to the required depth based on your tank size. Ensure the sides of the hole are straight and stable. Remove any rocks or roots during excavation. This creates a smooth base for your septic tank. “`
Constructing The Tank
Building a small septic tank for your RV can be a cost-effective and practical solution for waste management. With some basic materials and tools, you can construct a durable and efficient system. Let’s delve into the details of constructing the tank.
Building The Tank Walls
Start by creating the walls of your tank. You will need concrete blocks, cement, and sand. Mix the cement and sand to create a mortar. Place the concrete blocks in your desired location, forming a rectangular or square shape. Apply the mortar between each block to secure them.
Ensure the walls are at least 4 feet high. This height allows for sufficient waste storage. Let the walls dry for 24 hours. Once dry, check for any gaps or weak spots. Fill any gaps with additional mortar to ensure the tank is leak-proof.
Installing The Inlet And Outlet Pipes
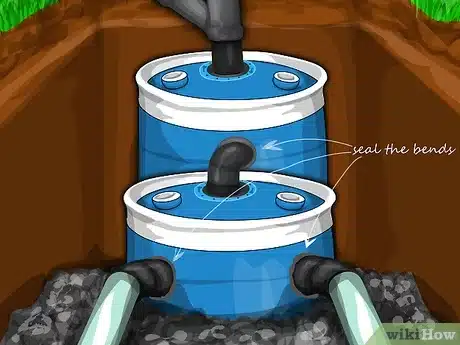
Next, install the inlet and outlet pipes. The inlet pipe should be placed at the top of one side of the tank. This pipe allows waste to enter the tank. Use a PVC pipe with a diameter of 4 inches.
The outlet pipe should be positioned at the bottom on the opposite side. This allows effluent to exit the tank and flow into a drain field. Ensure both pipes are securely fitted and sealed with waterproof sealant. This prevents leaks and ensures efficient waste management.
Once the pipes are installed, cover the tank with a concrete lid. This lid should have a small access hatch for inspection and maintenance. Ensure the lid is secure and airtight.
Installing The Drain Field
Setting up the drain field is a crucial part of building a small septic tank for your RV. The drain field helps to filter out the wastewater into the soil. This step ensures that the water is clean by the time it reaches the groundwater.
Laying The Drain Pipes
Start by digging trenches in your chosen area. These trenches should be about 18 to 36 inches deep and 12 inches wide. Make sure the bottom of each trench is level.
Next, lay perforated pipes in the trenches. These pipes should be made of PVC. Connect the pipes to the septic tank outlet. Ensure there is a slight slope, around 1/8 inch per foot. This slope helps the wastewater flow smoothly.
Adding Gravel And Soil
After placing the pipes, add a layer of gravel. Use gravel that is around 1 inch in diameter. The gravel should cover the pipes completely. This layer helps to filter the water.
Cover the gravel with a layer of geotextile fabric. This fabric stops the soil from mixing with the gravel. Finally, add a layer of soil on top. Use the soil you dug out earlier. Spread it evenly and compact it lightly.
Following these steps ensures your drain field works efficiently. It helps to keep the environment safe and your RV septic system in good condition.

Credit: www.youtube.com
Connecting To The Rv
Building a small septic tank for your RV can be a game-changer. The process involves several steps. One of the key steps is connecting the septic tank to the RV. This ensures that waste is properly managed and disposed of. Below, we’ll guide you through this crucial step.
Attaching The Rv Sewer Hose
First, you need to attach the RV sewer hose. Find the sewer outlet on your RV. It’s usually located near the rear. Remove the cap from the outlet. Next, take your sewer hose. Attach one end to the RV’s sewer outlet. Make sure it fits snugly. Twist it to lock it in place. The other end of the hose will connect to the septic tank.
Securing The Connections
Securing the connections is vital. Loose connections can lead to leaks. Ensure both ends of the sewer hose are tightly connected. Check for any gaps or loose fittings. If needed, use hose clamps to secure them. You can find hose clamps at most hardware stores. Tighten the clamps around the hose connections. This will ensure a tight, leak-free fit.
Once everything is secure, test the system. Run some water through the RV’s plumbing. Check for any leaks or drips. If you spot any, tighten the connections further. A secure setup ensures your small septic tank works efficiently.
Maintenance Tips
Maintaining a small septic tank for your RV ensures its longevity and efficiency. Regular upkeep can prevent costly repairs and unpleasant odors. Here are some essential maintenance tips for your RV septic tank.
Regular Inspection
Inspecting your septic tank regularly is crucial. Check for leaks or damages. Examine the tank’s inlet and outlet pipes for blockages. Look for cracks or corrosion in the tank.
- Inspect the tank every three months.
- Check the tank levels to avoid overfilling.
- Ensure the vent pipe is not blocked.
Using a checklist can help keep track of your inspections:
| Inspection Task | Frequency |
|---|---|
| Check for leaks | Every 3 months |
| Examine pipes for blockages | Every 3 months |
| Inspect tank levels | Every 3 months |
Cleaning The Tank
Regular cleaning of your septic tank is essential. It prevents buildup and ensures proper functioning. Use a septic-safe cleaner to avoid damaging the tank.
- Wear protective gear.
- Use a septic tank pump to remove waste.
- Rinse the tank with clean water.
- Use a septic-safe cleaner to scrub the tank walls.
- Rinse the tank again to remove any residue.
Cleaning the tank every six months can help maintain its efficiency. Avoid using harsh chemicals as they can damage the tank.
Following these tips ensures your RV septic tank remains in good condition. Regular maintenance can save you from costly repairs and keep your RV experience pleasant.

Credit: www.youtube.com
Frequently Asked Questions
What Materials Are Needed For A Small Rv Septic Tank?
To build a small RV septic tank, you need a durable plastic tank, PVC pipes, pipe fittings, gravel, and a vent pipe. Ensure all materials are high-quality.
How To Choose The Right Location For The Septic Tank?
Choose a location away from water sources, slopes, and traffic areas. It should be easily accessible for maintenance and pumping.
How To Install The Septic Tank For An Rv?
Dig a hole for the tank, lay gravel, place the tank, connect pipes, and install the vent. Test the system before use.
How Often Should I Maintain My Rv Septic Tank?
Inspect your RV septic tank every six months. Pump it out every 1-2 years, depending on usage.
Conclusion
Building a small septic tank for your RV can be manageable. Follow the steps carefully. Choose the right materials. Ensure proper installation for safe waste disposal. Regular maintenance will keep it functioning well. This DIY project can save you money.
Plus, it offers convenience when traveling. Enjoy your RV adventures with a reliable septic system.


