Understanding the RV black water tank is essential for a comfortable trip. It handles waste, so knowing its parts can prevent problems.
An RV black water tank diagram shows how waste management works in your vehicle. It highlights key components like the tank, valves, and pipes. This knowledge can help you maintain the system and avoid unpleasant surprises on the road. In this blog post, we will explore the diagram in detail.
You will learn about each part’s function and how they work together. Let’s dive in to ensure your RV adventures remain smooth and trouble-free.
Introduction To Rv Black Water Tanks
Understanding the components of an RV is essential for a smooth journey. One crucial part is the black water tank. This tank handles waste from your RV’s toilet. It’s vital to know its purpose and importance.
Purpose Of Black Water Tanks
The black water tank is where waste from the toilet is stored. It keeps the waste separate from other water systems. This separation helps maintain hygiene in the RV. The tank is designed to hold waste until it can be safely emptied.
Importance In Rvs
Black water tanks are essential for RV living. They allow you to use the toilet without connecting to a sewer system. This feature is especially helpful during long trips. Proper use and maintenance of the tank ensure a clean and comfortable RV environment.
Components Of A Black Water Tank System
The components of a black water tank system are essential for managing waste in your RV. A well-functioning black water tank system ensures comfort and hygiene on your travels. Below, we’ll explore the critical parts of this system.
Tank Material And Construction
The black water tank is made from durable materials like polyethylene. This material is chosen for its strength and resistance to waste chemicals. The construction ensures the tank can withstand the harsh environment inside.
Some tanks have reinforced walls to prevent leaks and cracks. The tank’s design includes an inlet for waste and an outlet for emptying. Proper construction prevents odors and ensures a long lifespan.
Valves And Connections
The valves and connections are crucial for the system’s operation. The primary valve is the dump valve, which controls the release of waste. This valve must be robust and easy to operate.
Connections include the inlet, which links to the toilet, and the outlet, which connects to the sewer hose. These connections need secure fittings to prevent leaks. Some systems also have a rinse connection for cleaning the tank.
Here’s a quick overview:
| Component | Function |
|---|---|
| Dump Valve | Controls waste release |
| Inlet | Connects to toilet |
| Outlet | Connects to sewer hose |
| Rinse Connection | For cleaning the tank |
Maintaining these components ensures your black water tank system works efficiently. Regular checks and cleaning are vital for long-term performance.
How Black Water Tanks Work
Understanding how black water tanks work is essential for RV owners. These tanks manage waste from your RV’s toilet. They store and process waste until it can be safely disposed of at a dump station.
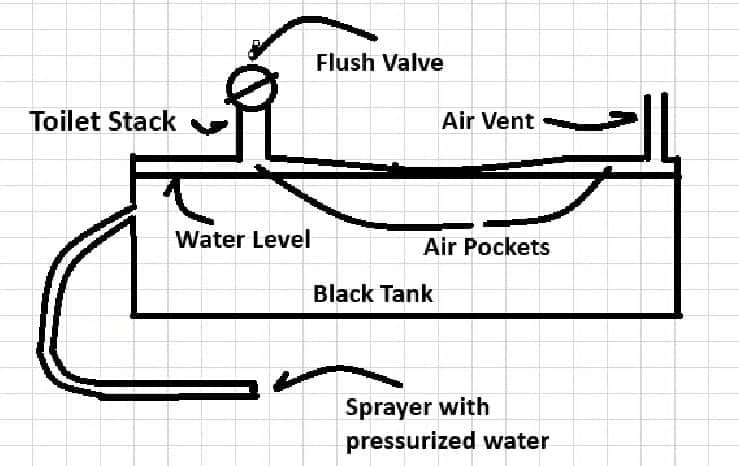
Waste Collection Process
Waste from the toilet flows directly into the black water tank. The tank is made from durable materials. It can handle the waste’s weight and volume. A vent pipe releases gases and odors outside the RV.
A sensor system monitors the tank’s fill level. It alerts you when the tank is nearing capacity. This system helps you avoid overflows and maintain hygiene.
Waste Disposal
Once the black water tank is full, it’s time to empty it. The process involves connecting a sewer hose to the tank’s outlet valve. The other end connects to a dump station inlet.
Opening the valve allows waste to flow out. Gravity assists in draining the tank. After emptying, it’s good practice to rinse the tank with water. This helps remove any remaining waste and reduces odors.
Regular maintenance keeps the system functioning well. It also extends the tank’s lifespan. Always use the correct chemicals designed for RV black water tanks.
Installing A Black Water Tank
Installing a black water tank in your RV is essential for a fully functional toilet system. This guide will walk you through the installation process, making it simple and easy to understand. Follow these steps to ensure a smooth installation experience.
Required Tools And Materials
Before you begin, gather the necessary tools and materials. This will help you complete the installation without any interruptions.
- Black water tank
- Wrenches and pliers
- Screwdriver set
- Pipe sealant tape
- Hose clamps
- Drill and drill bits
- Measuring tape
- Rubber gloves
- Safety goggles
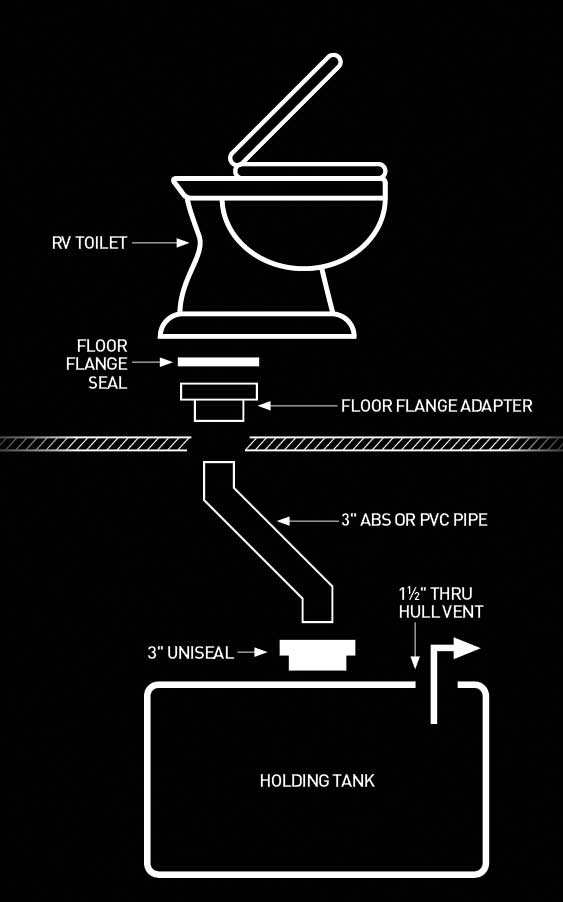
Step-by-step Installation Guide
Follow these steps to install your black water tank successfully.
- Choose the location: Find a suitable spot under your RV. Ensure it is accessible for maintenance and emptying.
- Measure and mark: Use the measuring tape to mark the tank’s position. Double-check the measurements to avoid errors.
- Drill mounting holes: Wearing safety goggles, drill holes where the tank will be secured. Use the appropriate drill bits.
- Install mounting brackets: Attach the brackets using screws and a screwdriver. Ensure they are firmly in place.
- Place the tank: Position the black water tank on the brackets. Secure it with hose clamps.
- Connect the pipes: Attach the inlet and outlet pipes. Use pipe sealant tape to prevent leaks. Tighten the connections with wrenches.
- Secure the hoses: Fasten the hoses with hose clamps. Ensure they are tight and secure.
- Check for leaks: Fill the tank with water and check for any leaks. Fix any issues before proceeding.
By following these steps, you will have a properly installed black water tank. This will ensure your RV’s toilet system functions correctly.
Maintaining Your Black Water Tank
Maintaining your RV’s black water tank is essential for a clean and odor-free experience. Proper care ensures the tank functions well and prevents costly repairs. Let’s explore some key tips to keep your black water tank in top condition.
Regular Cleaning Tips
Regular cleaning of your black water tank prevents buildup and blockages. Here’s how you can do it:
- Dump the tank when it is two-thirds full. This helps ensure proper flow.
- Use a tank cleaning wand to rinse the inside. Attach it to a hose and insert it through the toilet.
- Add a cup of baking soda and vinegar to the tank. Let it sit for a few hours before rinsing.
- Flush the tank with clean water. Repeat until the water runs clear.
Preventing Odors And Blockages
Preventing odors and blockages is crucial for a pleasant RV experience. Follow these tips:
- Use RV-safe toilet paper. It breaks down faster and reduces clogging.
- Avoid flushing non-biodegradable items. This includes wipes and feminine products.
- Add tank treatment chemicals. These help break down waste and control odors.
- Ensure proper ventilation. Open roof vents to help disperse odors.
- Check for leaks regularly. Repair any leaks immediately to prevent smells.
By following these tips, you can maintain a clean and odor-free black water tank. Proper care ensures your RV experiences are enjoyable and stress-free.
Common Issues And Troubleshooting
Understanding the common issues associated with your RV’s black water tank is essential. It helps in maintaining your system’s efficiency. This section covers some frequent problems and provides troubleshooting tips. These tips can help you address issues effectively.
Leak Detection And Repair
Leaks can cause significant damage and unpleasant odors. To detect leaks, inspect the tank and its components regularly. Look for any visible cracks or damaged seals.
If you find a leak, use a temporary sealant to fix it. Then, seek professional repair. Regularly check the tank’s fittings and hoses for wear and tear. Replace any worn-out parts promptly.
Handling Clogs And Blockages
Clogs and blockages are common issues in RV black water tanks. They can cause backups and unpleasant odors. To prevent clogs, use RV-friendly toilet paper. Avoid disposing of non-biodegradable items in the toilet.
If you experience a clog, a mixture of hot water and dish soap can help break it down. Pour this solution into the tank and let it sit for a few hours. Then, flush the tank thoroughly.
You can also use a tank wand or a flexible sewer hose to dislodge blockages. Regularly clean and maintain your tank to prevent future issues.
| Common Issues | Troubleshooting Tips |
|---|---|
| Leaks | Inspect for cracks, use sealant, replace worn parts |
| Clogs | Use hot water and soap, avoid non-biodegradable items |
Upgrading Your Black Water Tank System
Upgrading your RV’s black water tank system can improve your overall experience. A well-maintained system ensures hygiene and ease of use. Whether you are a full-time RVer or enjoy occasional trips, upgrading your tank can be beneficial.
New technology and improved materials offer better efficiency. Upgrades can also reduce odor issues and enhance waste management. Let’s explore how to choose the right upgrades and their installation benefits.
Choosing The Right Upgrades
Selecting the right upgrades is crucial for your RV’s black water tank system. Look for durable materials that resist wear and tear. Consider tanks with sensors to monitor waste levels. This can prevent overflows and leaks.
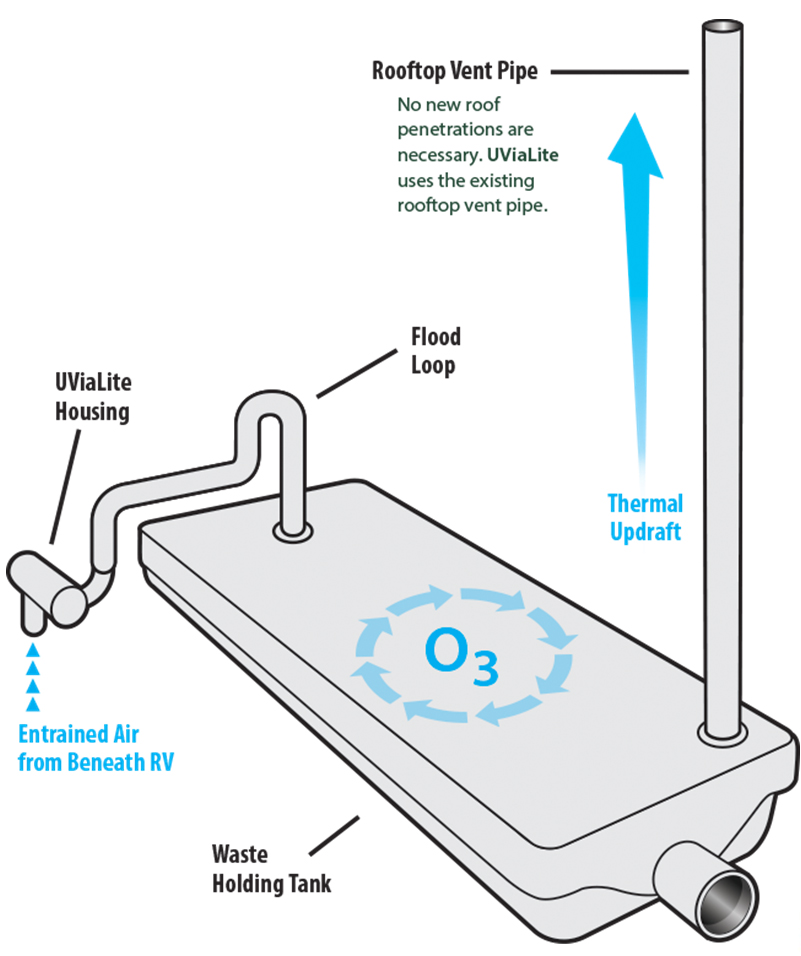
Improved venting systems can help reduce odors. They keep your RV smelling fresh. Choose valves that are easy to operate. This makes waste disposal simpler and faster.
Think about adding a tank rinser. This helps clean the tank thoroughly. It removes buildup and prevents clogs. Upgrading your hoses can also make a big difference. High-quality hoses are less likely to leak or break.
Installation And Benefits
Installing your new upgrades can be straightforward. Many systems come with detailed instructions. You may need basic tools and some DIY skills. If you prefer, hire a professional for installation.
The benefits of upgrading your black water tank system are clear. Improved waste management leads to a more pleasant RV experience. Reduced odors make your space more comfortable. Sensors and rinsers help maintain your tank with less effort.
Better hoses and valves mean fewer leaks and easier waste disposal. Overall, these upgrades can extend the lifespan of your tank. They also improve your RV’s resale value. Consider upgrading your black water tank system today.
Credit: www.rv.com
Eco-friendly Waste Management Solutions
Eco-friendly waste management solutions are vital for RV enthusiasts. Proper waste disposal ensures a cleaner environment and a healthier lifestyle. Many modern RVs are equipped with systems to handle waste efficiently. This section explores sustainable options for managing black water tanks in RVs.
Composting Toilets
Composting toilets are an excellent eco-friendly option. These toilets convert human waste into compost. They use little to no water. This makes them ideal for RVs with limited water supply. They help reduce the overall waste volume. The compost can be used for non-edible plants.
Composting toilets are simple to maintain. They require regular emptying of the compost. This is usually every few weeks. They also need a carbon-rich material. Sawdust or coconut coir are good options. These help to balance the waste and reduce odors.
Chemical-free Cleaning Options
Chemical-free cleaning options are crucial for eco-friendly RV waste management. Traditional cleaning products contain harmful chemicals. These can pollute the environment. Opt for natural cleaning agents. Vinegar and baking soda are effective choices.
Vinegar is a natural disinfectant. It helps clean the black water tank without chemicals. Baking soda removes odors. Together, they offer a powerful cleaning solution. They are safe for the environment and your health. Regular cleaning with these agents keeps your RV’s waste system efficient.
Credit: www.nirvc.com
Frequently Asked Questions
What Is A Black Water Tank In An Rv?
A black water tank in an RV is the tank that holds waste from the toilet. It stores sewage until you can safely dispose of it.
How Do You Empty An Rv Black Water Tank?
To empty an RV black water tank, attach the sewer hose to the tank outlet. Open the valve and let it drain into a dump station.
Why Is It Important To Maintain The Black Water Tank?
Maintaining the black water tank prevents clogs and bad odors. Regular cleaning and proper chemical treatments keep the system functioning well.
Can You Use Regular Toilet Paper In An Rv?
No, regular toilet paper can clog the RV’s black water tank. Use RV-specific, biodegradable toilet paper to prevent blockages.
Conclusion
Understanding your RV’s black water tank is crucial. Proper maintenance prevents issues. The diagram simplifies this process. Regular checks keep your system running smoothly. Avoid costly repairs with these tips. Stay informed, stay prepared.


