Winterizing your RV is crucial to protect it from freezing temperatures. But how many gallons does it take?
The exact answer depends on your RV’s size and plumbing system. Preparing your RV for winter involves several steps, and using the right amount of antifreeze is key. Understanding how many gallons are needed ensures your pipes and tanks stay safe during cold months.
Typically, RVs require 2 to 3 gallons of antifreeze. This amount varies based on the RV’s layout and the complexity of its plumbing. To avoid any damage, it’s essential to know your RV’s specific needs. In this guide, we’ll explore the factors affecting the amount of antifreeze required and provide tips for winterizing your RV effectively. Stay tuned for detailed insights and practical advice!

Credit: www.cbs17.com
Importance Of Winterizing Your Rv
Winterizing your RV is crucial to protect it from the harsh winter conditions. Failing to do so can lead to significant damage and costly repairs. By taking the necessary steps to winterize your RV, you ensure that it remains in good condition and ready for use when spring arrives.
Protecting Your Investment
Your RV is a significant investment. Proper winterization helps maintain its value. Cold temperatures can cause water pipes to freeze and burst, leading to extensive damage. Winterizing your RV prevents this by ensuring all water is drained and replaced with antifreeze. This simple step can save you thousands of dollars in repairs.
Preventing Costly Repairs
Water damage is one of the most common issues faced by RV owners during winter. Frozen pipes and tanks can crack and leak, causing water damage to the interior. Winterizing your RV includes draining all water systems and adding antifreeze to prevent freezing. This proactive measure can prevent costly repairs and extend the life of your RV.
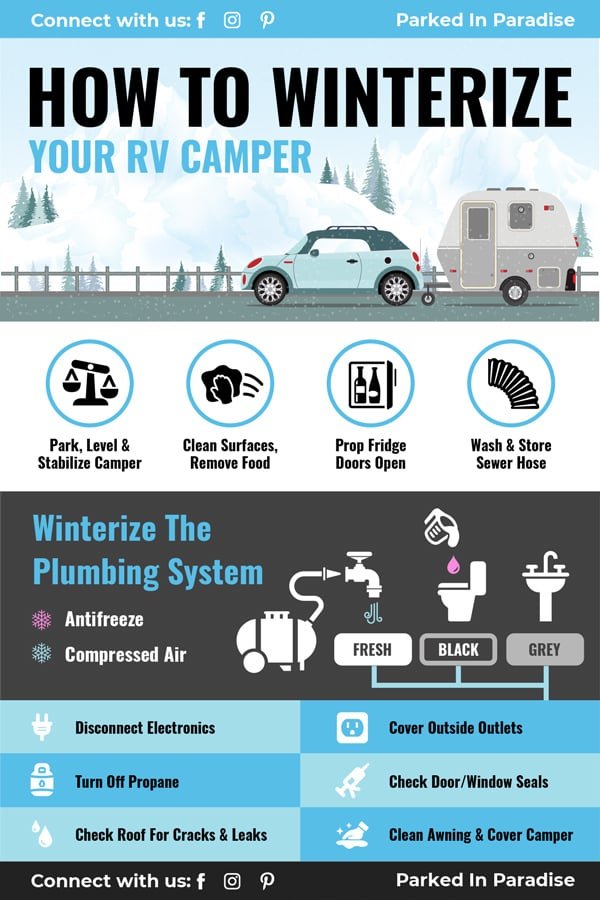
Here’s a basic checklist for winterizing your RV:
- Drain all water tanks and lines
- Add RV antifreeze to the plumbing system
- Disconnect and store the battery
- Seal all windows and doors
- Cover the RV to protect it from snow and ice
Following these steps ensures your RV stays in top condition throughout the winter months. Protect your investment and avoid unnecessary repairs by properly winterizing your RV.

Credit: www.amazon.com
When To Winterize Your Rv
Winterizing your RV is essential to protect it from the cold. This process helps prevent damage from freezing temperatures. Knowing when to winterize ensures your RV stays in good condition through the winter months.
Ideal Time Frame
The ideal time to winterize your RV is before the first frost. This is typically in late fall, around October or November. Check local weather forecasts to determine the best timing for your area.
Waiting too long can result in damage. Freezing temperatures can cause pipes to burst. Winterizing before temperatures drop below freezing is crucial.
Plan ahead. Make sure you have all necessary supplies. This includes antifreeze, tools, and a winterizing checklist.
Signs You Need To Winterize
- Temperature forecasts show consistent lows below 32°F (0°C).
- You notice frost or ice forming on outdoor surfaces.
- Your RV will be stored for an extended period.
- Water in your RV’s plumbing system is not being used regularly.
These signs indicate it’s time to take action. Winterizing helps avoid costly repairs. Protect your investment by acting promptly.
Winterizing an RV involves several steps. Each step ensures your RV is safe from winter damage. Follow a detailed guide to do it right.
| Step | Action |
|---|---|
| 1 | Drain all water from the system. |
| 2 | Add RV antifreeze to the plumbing. |
| 3 | Check seals and weather stripping. |
| 4 | Store the RV in a sheltered location if possible. |
Winterizing your RV is a straightforward process. Following these steps will help keep your RV in great shape. Ready for your next adventure once spring arrives.
Tools And Materials Needed
Winterizing your RV is essential to protect it from freezing temperatures. Using the right tools and materials makes this task easier and more effective. Below is a detailed list of what you will need to get the job done right.
Essential Tools
Having the right tools can make the winterizing process smooth and efficient. Here are the essential tools you will need:
- Water Pump Converter Kit – To bypass the water heater.
- Basic Hand Tools – Wrenches, screwdrivers, and pliers.
- Air Compressor – To blow out water lines.
- Hose Adapter – For connecting the air compressor to the water lines.
Recommended Materials
In addition to the tools, you will need specific materials for winterizing your RV:
- RV Antifreeze – Non-toxic antifreeze designed for RV systems.
- Water Filters – Replace any old or clogged filters.
- Cleaning Supplies – For cleaning tanks and lines before adding antifreeze.
- Rubber Gloves – To protect your hands during the process.
Below is a summary table for quick reference:
| Category | Items |
|---|---|
| Essential Tools | Water Pump Converter Kit, Basic Hand Tools, Air Compressor, Hose Adapter |
| Recommended Materials | RV Antifreeze, Water Filters, Cleaning Supplies, Rubber Gloves |
Step-by-step Winterizing Process
Winterizing your RV is important to protect it from the cold. This guide will help you understand the process. Follow these steps to ensure your RV is ready for winter. We’ll cover draining water systems and adding antifreeze.
Draining Water Systems
First, you need to drain the water from your RV. This includes all water lines, tanks, and appliances.
- Turn off the water heater. Let it cool down.
- Open all faucets and let the water drain out.
- Locate the water heater drain plug and open it to release water.
- Find the low-point drains on your RV and open them. These are usually marked.
- Empty the fresh water tank. Use the drain valve to do this.
- Flush the toilet to remove any remaining water.
Draining the water system is crucial. It prevents water from freezing and causing damage.
Adding Antifreeze
Next, you need to add antifreeze to protect the pipes. Use RV-specific antifreeze. It’s safe for drinking water systems.
- Close all the drains and faucets that you opened earlier.
- Bypass the water heater. This saves on antifreeze.
- Attach a siphon kit to the water pump. You can find this in most RV stores.
- Place the siphon hose in the antifreeze container.
- Turn on the water pump. This will pull antifreeze into the system.
- Open each faucet one at a time. Wait until you see pink antifreeze flowing.
- Flush the toilet until you see antifreeze in the bowl.
- Pour some antifreeze down each drain. This includes sinks, showers, and the toilet.
Adding antifreeze ensures that any remaining water in the system won’t freeze. This step is essential to prevent damage during winter.
Follow these steps carefully to winterize your RV. It will help protect your investment and ensure your RV is ready for use in the spring.
Calculating Antifreeze Needed
Winterizing your RV ensures it stays in good condition during cold months. Knowing how many gallons of antifreeze you need is crucial. This guide helps you calculate the right amount.
Determining Gallon Requirements
To determine the gallons required, consider your RV’s plumbing system. Check the owner’s manual for specifics on water lines, tanks, and fixtures. Most RVs need between 2 and 3 gallons. Larger RVs with more plumbing may need up to 4 gallons. Always round up to avoid running out.
Factors Affecting Quantity
Several factors affect the amount of antifreeze you need. The size of your RV is a major factor. More plumbing means more antifreeze. The number of fixtures also matters. Each sink, shower, and toilet requires antifreeze. Consider the length of the water lines. Longer lines need more antifreeze.
Temperature plays a role too. Colder climates may require more antifreeze. This ensures all parts of the system are protected. Personal usage habits can impact the amount needed. If you frequently use your RV, more antifreeze may be necessary.
Common Mistakes To Avoid
Winterizing your RV ensures it stays in top shape during the cold months. Many people make mistakes during this process. These errors can lead to costly repairs and stress. Understanding these common mistakes helps you avoid them.
Overlooking Small Details
Small details are easy to miss. Ignoring these can cause big problems. For example, leaving water in your faucets. This water can freeze and expand. It may cause pipes to burst. Always drain all water from the RV. Check every faucet, shower, and toilet.
Another small detail is forgetting to clean the water heater. Sediment can build up inside. This sediment can freeze and damage the heater. Always flush and clean the water heater before winterizing.
Do not forget to close all windows and vents. Cold air can enter through these openings. It can make your RV very cold. It can also lead to moisture buildup. This moisture can cause mold and mildew. Always check and close all windows and vents.
Using Incorrect Antifreeze
Not all antifreeze is the same. Some are made for cars. Others are made for RVs. Using the wrong antifreeze can harm your RV. Always use RV-specific antifreeze. It is safe for your plumbing system. It also prevents corrosion.
Do not dilute the antifreeze. Adding water reduces its effectiveness. It may not protect your RV in very cold temperatures. Always use full-strength antifreeze.
Read the label before buying antifreeze. Some products contain harmful chemicals. These can damage your RV’s plumbing system. Always choose a non-toxic, RV-specific antifreeze.
Using the right amount of antifreeze is crucial. Too little may not protect your RV. Too much is wasteful. Follow the manufacturer’s guidelines. Typically, 2-3 gallons is enough for most RVs. Always double-check your RV’s requirements.
Aftercare And Maintenance Tips
Winterizing your RV is crucial. Yet, proper aftercare and maintenance ensure your RV remains in top shape. These tips help you maintain your RV and avoid potential issues in the spring.
Regular Inspections
Inspect your RV regularly. Check for leaks, especially around windows and doors. Look at the roof and seals. Ensure everything is intact.
Check the tires. Inflate them to the recommended pressure. This prevents flat spots. Also, inspect the battery. Charge it if needed.
Storage Tips
Store your RV in a covered area. This protects it from harsh weather. If you don’t have a covered space, use an RV cover. This keeps snow and ice off.
Ventilate the interior. Open vents slightly to allow air circulation. This helps prevent mold and mildew.
Remove any food or perishable items. Clean the fridge and leave it open. This avoids bad odors.
| Task | Frequency |
|---|---|
| Inspect for leaks | Monthly |
| Check tire pressure | Monthly |
| Charge battery | Monthly |
| Ventilate interior | Continuously |
By following these aftercare and maintenance tips, you ensure your RV remains ready for your next adventure. Regular inspections and proper storage are key to a long-lasting RV.
Faqs About Winterizing Rvs
Winterizing your RV is essential to protect it from cold weather damage. Many RV owners have questions about the process. Below, we provide answers to some of the most common questions. This guide will help ensure your RV is ready for winter.
Common Questions
- How many gallons of antifreeze do I need? You will need about 2-3 gallons of RV antifreeze.
- What kind of antifreeze should I use? Use non-toxic RV antifreeze that is safe for drinking water systems.
- Do I need to drain the water heater? Yes, always drain the water heater to prevent damage.
- Should I bypass the water heater? Yes, bypassing the water heater prevents antifreeze from entering it, saving you money.
- Is it necessary to blow out the water lines? Blowing out the lines with compressed air is recommended to remove all water.
- What about the holding tanks? Empty and clean all holding tanks, then add antifreeze to the drains.
Expert Answers
| Question | Expert Answer |
|---|---|
| How many gallons of antifreeze are needed? | Typically, you will need 2-3 gallons of RV antifreeze. |
| Should I use a specific type of antifreeze? | Yes, use non-toxic RV antifreeze that is safe for potable water systems. |
| Do I need to drain the water heater? | Yes, draining the water heater is essential to avoid freezing damage. |
| Is bypassing the water heater necessary? | Yes, it helps prevent antifreeze from entering the heater and saves money. |
| Is blowing out water lines necessary? | Yes, using compressed air ensures all water is removed from the lines. |
| How should I prepare the holding tanks? | Empty, clean, and add antifreeze to the holding tank drains. |
By following these expert recommendations, you can effectively winterize your RV. Protecting your vehicle from winter damage ensures it will be ready for your next adventure.

Credit: www.amazon.com
Frequently Asked Questions
How Many Gallons To Winterize An Rv?
To winterize an RV, you’ll typically need 2 to 3 gallons of RV antifreeze. The exact amount depends on the size and layout of your RV’s plumbing system.
What Type Of Antifreeze For Rv Winterization?
Use only non-toxic RV antifreeze for winterizing. It’s specifically designed for RV plumbing and is safe for water systems.
Can I Use Regular Antifreeze In My Rv?
No, regular antifreeze is toxic and not safe for RV water systems. Always use non-toxic RV antifreeze.
How Do You Winterize An Rv’s Water System?
Drain the water system, bypass the water heater, and pump RV antifreeze through all faucets, showers, and toilets.
Conclusion
Winterizing your RV is essential for protection during colder months. Using the right amount of antifreeze ensures your pipes and systems stay safe. Typically, two to three gallons are enough for most RVs. Consult your RV manual for specifics. By properly winterizing, you can prevent costly repairs and ensure your RV stays in good condition.
Stay ahead of the cold and get your RV ready now. Happy travels!


