If you own an RV, understanding how to wire a 50 amp receptacle is essential. Proper wiring ensures a safe and reliable power supply for your vehicle.
A 50 amp RV receptacle wiring diagram can seem complex at first glance. But with the right guidance, it’s manageable for most DIY enthusiasts. This guide aims to simplify the process, breaking down each step in a clear and easy-to-follow manner.
Whether you are upgrading your RV’s electrical system or setting up a new connection, having a reliable wiring diagram is crucial. This post will help you navigate the essentials, ensuring your RV’s electrical setup is both safe and efficient. Let’s dive in and make this task straightforward and stress-free.
Introduction To 50 Amp Rv Receptacle
When setting up your RV, a 50 Amp RV receptacle is essential. It ensures your RV gets the right power supply. This setup is crucial for safety and functionality. Understanding the wiring diagram helps in proper installation. Let’s dive into the basics and benefits of a 50 Amp RV receptacle.
Purpose And Benefits
The 50 Amp RV receptacle provides ample power for your RV. It supports multiple appliances and devices. This is especially useful for larger RVs with high power needs. The receptacle ensures stable power distribution. You can run your air conditioner, microwave, and other devices without issues.
Another benefit is safety. Properly wired receptacles prevent power surges. They also reduce the risk of electrical fires. Using a 50 Amp receptacle means fewer power interruptions. It offers peace of mind during your travels.
Safety Precautions
Safety is paramount when wiring a 50 Amp RV receptacle. Always turn off the power supply before starting. This prevents accidental shocks and injuries. Use high-quality wires and connectors. Cheap materials can cause overheating and failures.
Follow the wiring diagram closely. Incorrect wiring can damage your RV’s electrical system. Ensure all connections are tight and secure. Loose connections can lead to arcing and fire hazards. Lastly, consider hiring a professional electrician. They have the expertise to ensure a safe and reliable setup.
Tools And Materials Needed
Wiring a 50 Amp RV receptacle requires the right tools and materials. This guide will help you gather everything you need. Prepare yourself for a successful wiring project.
Essential Tools
Having the correct tools makes the job easier and safer. Below is a list of essential tools:
- Wire Strippers: For removing insulation from the wires.
- Voltage Tester: To ensure the circuit is de-energized before work.
- Needle Nose Pliers: For bending and holding wires.
- Screwdrivers: Both flathead and Phillips for connecting wires to terminals.
- Drill: For mounting the receptacle box.
Required Materials
Gather the necessary materials before starting the wiring project. Here are the materials you will need:
| Material | Description |
|---|---|
| 50 Amp RV Receptacle | A 50 Amp receptacle suitable for RVs. |
| Electrical Wire | 6-gauge wire for the 50 Amp service. |
| Receptacle Box | Weatherproof box for outdoor installation. |
| Wire Connectors | Connectors for securing wire connections. |
| Electrical Tape | Insulating tape for securing wire connections. |
Understanding The Wiring Diagram
Understanding the wiring diagram of a 50 Amp RV receptacle is essential for safe and efficient installation. It helps ensure that all connections are correctly made and reduces the risk of electrical issues. Let’s break down the key components and color coding used in the diagram.
Diagram Components
The wiring diagram for a 50 Amp RV receptacle includes several important parts. Each part has a specific role:
- Receptacle: The outlet where the RV plugs in.
- Breaker Box: Contains the circuit breakers to protect the electrical circuit.
- Wires: Connect the receptacle to the breaker box.
- Ground Rod: Provides a safe path for electricity in case of a fault.
Color Coding
Color coding in the wiring diagram makes it easier to identify different wires:
| Color | Wire Function |
|---|---|
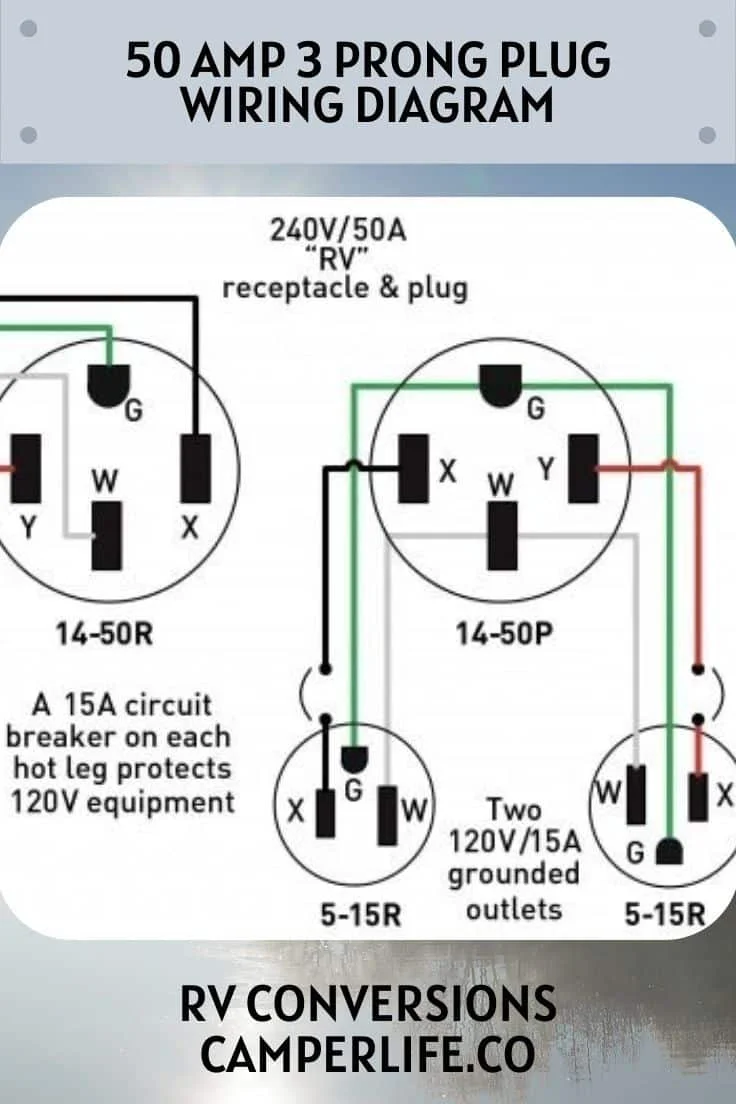
| Black | Hot wire 1 (carries 120 volts) |
| Red | Hot wire 2 (carries 120 volts) |
| White | Neutral wire (carries current back to the source) |
| Green/Bare | Ground wire (safety) |
Understanding these components and color codes makes wiring a 50 Amp RV receptacle straightforward. Always double-check connections before use to ensure safety.
Preparing For Installation
Installing a 50 Amp RV receptacle might seem complicated. But with the right preparation, it becomes much easier. This section will guide you through crucial steps to get started. Follow these steps to ensure a smooth installation process. Let’s dive into the details.
Choosing The Location
First, decide where to install the receptacle. It should be near your RV parking spot. Ensure the location is convenient for plugging in your RV. Avoid placing it near water sources or flammable materials. The chosen spot should be accessible and safe. Consider the length of your RV’s power cord. Ensure it can reach the receptacle without straining.
Turning Off Power
Safety first! Always turn off the main power before starting. This step is crucial to avoid electrical accidents. Locate your home’s main breaker panel. Switch off the main breaker to cut power to the house. Double-check to ensure the power is off. Use a voltage tester if necessary. This guarantees a safe working environment.
Step-by-step Wiring Instructions
Wiring a 50 Amp RV receptacle might seem daunting. With these clear steps, you can do it safely and correctly. Follow each step, and soon you’ll have a secure connection.
Mounting The Receptacle
First, choose a suitable location. The area should be dry and easily accessible. Ensure you have enough space to work comfortably.
Next, turn off the power at the breaker. This step is crucial for your safety.
Now, attach the mounting box to the chosen location. Use screws to secure it firmly. Ensure the box is level for a neat finish.
Connecting The Wires
Begin by stripping the insulation from the wires. Use a wire stripper for clean cuts.
Identify the four wires: black, red, white, and green. Each has a specific role in the circuit.
Connect the black wire to the brass terminal. This wire carries one leg of the 240-volt power.
Attach the red wire to the other brass terminal. It carries the other leg of the 240-volt power.
The white wire is the neutral. Connect it to the silver terminal.
Finally, connect the green wire to the ground terminal. This wire ensures safety by grounding the circuit.
After making all connections, double-check your work. Ensure all wires are secure and terminals are tight.
Replace the cover on the receptacle. Restore the power at the breaker and test the connection.
Your 50 Amp RV receptacle is now ready to use. Enjoy your travels with a reliable power source.
Testing The Installation
Testing the installation of your 50 Amp RV receptacle wiring diagram is crucial. It ensures the safety and functionality of your setup. This step confirms that everything is wired correctly and that the system operates as expected. Proper testing helps avoid potential electrical issues and keeps your RV powered safely.
Using A Multimeter
A multimeter is essential for testing electrical installations. First, set your multimeter to the voltage setting. This allows you to measure the electrical output accurately. Make sure the multimeter is calibrated correctly before use.
Next, insert the probes into the appropriate slots. Place the black probe into the neutral slot, and the red probe into the hot slot. Record the reading displayed on the multimeter. This step helps verify that the connections are secure and functioning.
Checking For Proper Voltage
After using the multimeter, check for proper voltage. The voltage should read around 240 volts for a 50 Amp RV receptacle. If the reading is significantly lower or higher, there might be an issue. Double-check your wiring connections.
Ensure that both hot wires show the correct voltage. This confirms that each leg of the circuit is working properly. If one leg shows an incorrect voltage, re-examine the wiring. Correct any errors to avoid potential hazards.
Troubleshooting Common Issues
Troubleshooting common issues with a 50 Amp RV receptacle can help ensure your RV stays powered. Problems can range from no power to incorrect voltage. Below are some steps to help you troubleshoot these issues effectively.
No Power
If your 50 Amp RV receptacle has no power, it can be frustrating. Here are some steps to follow:
- Check the circuit breaker: Ensure the breaker is not tripped. Reset if necessary.
- Inspect the connections: Loose or corroded connections can cause power loss. Tighten all connections.
- Test the outlet: Use a voltmeter to check if the outlet is providing power. If not, it might need replacement.
- Examine the power cord: Look for any signs of wear or damage. Replace if you find any issues.
Incorrect Voltage
Incorrect voltage can harm your RV’s electrical system. Follow these steps to resolve voltage issues:
- Measure the voltage: Use a voltmeter to check the voltage at the receptacle. It should read around 240 volts.
- Check for voltage drops: If the voltage is low, check all connections for tightness. Loose connections can cause voltage drops.
- Inspect the breaker box: Ensure all breakers are functioning properly. Replace any faulty breakers.
- Look for external factors: Voltage can be affected by factors such as a weak power supply or other heavy loads on the circuit.
By following these steps, you can troubleshoot common issues with your 50 Amp RV receptacle wiring. This ensures your RV stays powered and safe.

Credit: www.pinterest.com
Maintenance Tips
Maintaining your 50 Amp RV receptacle wiring is crucial for safety and functionality. Regular care helps prevent issues and prolongs the lifespan of your setup. Let’s dive into some essential maintenance tips that will keep your system running smoothly.
Regular Inspections
Conducting regular inspections is vital. Check your wiring and receptacle at least once a month. Look for signs of wear and tear. Ensure all connections are tight and secure. Loose connections can lead to electrical hazards.
- Inspect for any frayed or exposed wires.
- Check the receptacle for any cracks or damage.
- Ensure the ground connection is intact.
Using a voltage tester can help verify that the circuit is functioning correctly. This small step can prevent major issues down the line.
Cleaning The Receptacle
Keeping the receptacle clean ensures good electrical contact. Dirt and debris can cause poor connections and increase fire risk.
- Turn off the power at the breaker box.
- Use a soft brush to remove any visible dirt.
- Clean the contacts with a contact cleaner or rubbing alcohol.
- Ensure everything is dry before restoring power.
Regular cleaning should be done every few months. This practice helps maintain a reliable and safe electrical connection.
By following these maintenance tips, you can ensure your 50 Amp RV receptacle remains in top condition.

Credit: www.gearit.com
Frequently Asked Questions
What Is A 50 Amp Rv Receptacle?
A 50 amp RV receptacle is an electrical outlet designed for RVs. It provides 50 amps of power. This is sufficient for running multiple appliances.
How Do I Wire A 50 Amp Rv Receptacle?
To wire a 50 amp RV receptacle, connect the hot wires to the breaker, the neutral wire to the neutral bus, and the ground wire to the ground bus.
What Size Wire For A 50 Amp Rv Receptacle?
For a 50 amp RV receptacle, use 6-gauge wire. It handles the high current safely, preventing overheating.
Can I Install A 50 Amp Rv Receptacle Myself?
Yes, you can install it yourself. However, ensure you follow electrical codes. If unsure, hire a licensed electrician for safety.
Conclusion
Understanding the 50 Amp RV receptacle wiring diagram is crucial. It ensures safety and proper functionality. Follow the steps and guidelines carefully. Double-check your connections. Use the correct tools and materials. Seek help if you feel unsure. This guide simplifies the process for you.
Enjoy your RV adventures with confidence. Proper wiring avoids potential issues. Happy and safe travels!


