Understanding a 50 Amp RV distribution panel wiring diagram is vital for RV enthusiasts. It ensures a safe and efficient power supply.
A 50 Amp RV distribution panel manages the electricity in your RV, distributing power to various appliances. This panel plays a crucial role in maintaining a reliable electrical system, which is essential for comfort and safety on the road. Whether you are a seasoned RV owner or a beginner, knowing how your distribution panel works can save you from potential issues.
In this blog post, we will explore the basic components and wiring setup of a 50 Amp RV distribution panel. This knowledge will help you troubleshoot problems and ensure your RV’s electrical system runs smoothly.
Tools And Materials
Understanding the tools and materials needed for wiring a 50 Amp RV distribution panel is crucial. Proper preparation ensures a smooth and safe installation process. This section will guide you through the essential tools and required materials for the task.
Essential Tools
Before starting the wiring process, gather all necessary tools. A few key tools are essential to complete the job efficiently.
Wire Strippers: These are crucial for removing insulation from wires without damaging them.
Screwdrivers: Both flathead and Phillips screwdrivers are needed. These will help in tightening connections.
Multimeter: This tool helps check the electrical current and ensure safety.
Crimping Tool: Needed for crimping connectors on the ends of wires.
Drill: Useful for mounting the distribution panel securely.
Required Materials
Having the right materials is as important as having the right tools. Here are the essential materials for wiring a 50 Amp RV distribution panel.
50 Amp Circuit Breaker: This is necessary for the main power supply.
Distribution Panel: The central hub for all the electrical connections.
Wire Connectors: Used to join wires securely and safely.
Electrical Tape: Essential for insulating wire connections.
Grounding Wire: Ensures all electrical circuits are properly grounded.
Conduit: Protects wires and provides a neat installation.
Labels: Helps in identifying different wires and connections.

Credit: www.airforums.com
Safety Precautions
Installing a 50 Amp RV distribution panel requires utmost care. Safety should always be your top priority. Electrical work is risky. Following proper safety measures can prevent accidents and injuries.
Electrical Safety Tips
Understanding electrical safety is crucial. Here are some important tips:
- Turn off the main power before starting any work.
- Double-check all connections before powering up.
- Use insulated tools to avoid electric shocks.
- Keep water away from the work area.
- Do not overload the panel with too many circuits.
Proper planning can prevent many issues. Always follow the manufacturer’s instructions. Ensure your wiring diagram is accurate and clear.
Personal Protective Equipment
Wearing the right personal protective equipment (PPE) is essential. It can save your life. Here is a list of recommended PPE:
| Equipment | Purpose |
|---|---|
| Insulated Gloves | Prevent electric shocks. |
| Safety Goggles | Protect your eyes from sparks. |
| Rubber-Soled Shoes | Reduce the risk of electrical grounding. |
| Hard Hat | Protect your head from falling objects. |
Using PPE is non-negotiable. Always inspect your gear before use. Replace any damaged equipment immediately.
Understanding The Diagram
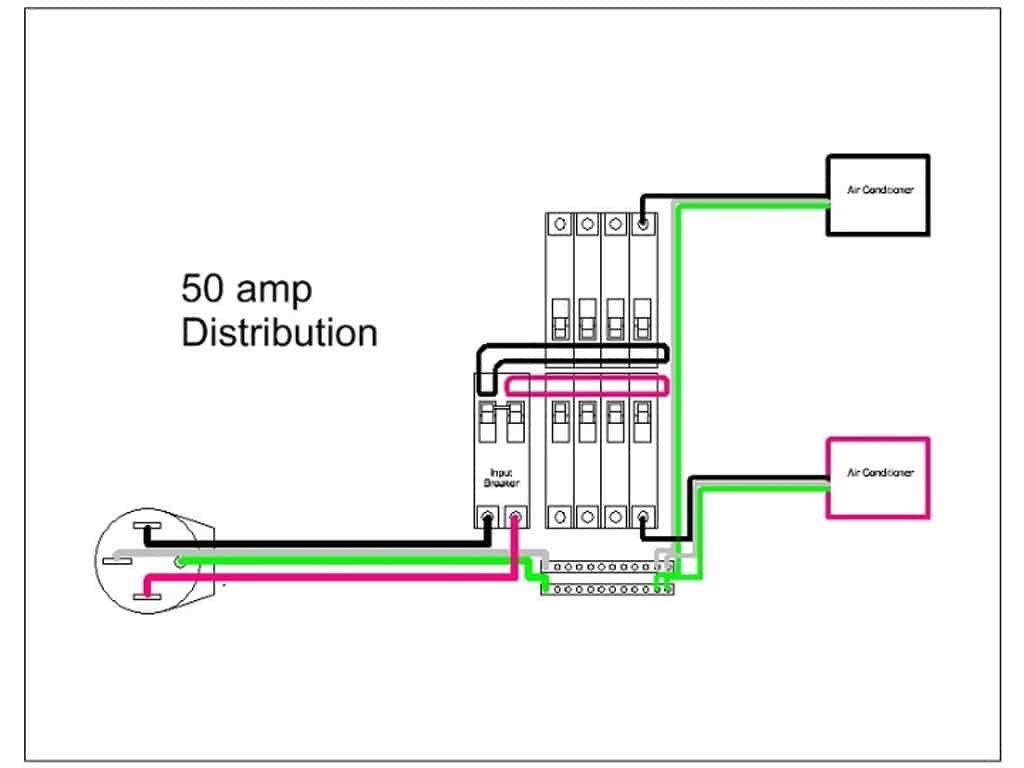
The 50 Amp RV distribution panel wiring diagram can seem complex at first glance. Yet, it is a crucial part of understanding your RV’s electrical system. Knowing how to read the diagram helps in troubleshooting issues and making repairs. Let’s break down the diagram into understandable sections.
Key Components
The diagram includes several key components, each playing a vital role in the distribution of power:
- Main Breaker: This controls the power entering the RV.
- Branch Circuits: These distribute power to different appliances.
- Neutral Bus: This provides a return path for the electrical current.
- Ground Bus: This ensures safety by grounding the electrical system.
Symbols And Their Meanings
The diagram uses specific symbols to represent different components. Understanding these symbols is essential:
| Symbol | Meaning |
|---|---|
| ● | Connection Point |
| ⏚ | Ground |
| ↔ | Current Path |
These symbols help in identifying the flow of electricity and where connections are made.
Step-by-step Installation
Follow this detailed guide to install a 50 Amp RV distribution panel. The wiring diagram simplifies connections, ensuring a safe and efficient setup.
Installing a 50 Amp RV distribution panel may seem daunting. But with clear instructions, it becomes manageable. Follow these steps to ensure a smooth installation process.
Preparing The Panel
Start by selecting the right location for your panel. Ensure the area is dry and easily accessible. Gather your tools, including a screwdriver, wire stripper, and pliers. Double-check you have the correct panel and wires. Safety is important. Turn off the main power supply before starting. Next, mount the distribution panel on the wall. Use screws to secure it in place. Make sure the panel is level. This will make wiring easier and safer.
Connecting The Wires
Begin by connecting the ground wire. This wire is usually green or bare. Attach it to the grounding bus bar inside the panel. Tighten the screws to secure it. Next, connect the neutral wire. It is typically white. Attach it to the neutral bus bar. Ensure it is tight and secure. Finally, connect the two hot wires. These wires are often black and red. Attach each to a separate breaker. Make sure they are firmly connected. Once all wires are connected, double-check each connection. Ensure there are no loose wires. Tighten any screws as needed. Turn the main power supply back on. Test the panel to ensure everything is working properly. If you find any issues, turn off the power and check your connections again. By following these steps, you can successfully install your 50 Amp RV distribution panel. It ensures your RV electrical system is safe and efficient.
Testing The Connections
Testing the connections in your 50 Amp RV distribution panel is a crucial step. This ensures everything is wired correctly and works safely. Incorrect wiring can lead to serious issues. Therefore, thorough testing is essential.
Initial Checks
First, ensure that all power sources are off. This includes the main breaker and any other connected power supplies. Safety is paramount. Once you confirm this, inspect the panel visually. Look for loose wires or any visible damage. Tighten all connections using a screwdriver. Secure connections are key to a safe system.
Next, use a multimeter to check voltage levels. Set the multimeter to the appropriate setting. Test each wire in the panel. Ensure the readings match the expected values. This step helps identify any potential wiring errors early on.
Troubleshooting Common Issues
If you find any issues, don’t panic. Start by checking the wiring diagram again. Ensure each wire is in the correct place. Sometimes, a simple error can cause a big problem. Double-checking can save you a lot of trouble.
Another common issue is loose connections. Even if you tightened them before, recheck them. Vibrations during travel can loosen screws. A loose connection can cause intermittent power issues. Use a torque screwdriver for the best results.
If you still face problems, consider the breakers. Sometimes, a breaker might be faulty. Test each breaker individually. Replace any that fail the test. This can solve many electrical issues in an RV.
Finally, ensure your grounding is proper. Poor grounding can cause various electrical problems. Check the grounding wire for any signs of damage. Replace it if necessary.

Credit: www.airforums.com
Maintenance Tips
Maintaining your 50 Amp RV Distribution Panel is crucial for safety and efficiency. Regular upkeep can prevent electrical failures and ensure your RV operates smoothly. Below are essential maintenance tips to help you keep your distribution panel in top condition.
Regular Inspections
Conducting regular inspections is key to identifying potential issues early.
- Visual Check: Examine the panel for any visible damage or wear.
- Connection Tightness: Ensure all connections are tight and secure.
- Corrosion: Look for signs of corrosion on wires and terminals.
Inspect the panel at least twice a year. Make it a habit to check before long trips.
Common Repairs
Addressing common repairs promptly can save you from bigger problems.
| Issue | Solution |
|---|---|
| Tripped Breakers | Reset the breaker. If it trips again, inspect the connected appliances. |
| Loose Connections | Tighten any loose connections using a screwdriver. |
| Corroded Terminals | Clean the terminals with a wire brush and apply anti-corrosion spray. |
Keep a small toolkit handy for quick repairs. This ensures you’re always prepared for minor issues.
Frequently Asked Questions
What Is A 50 Amp Rv Distribution Panel?
A 50 amp RV distribution panel is an electrical panel that distributes power within an RV. It ensures the safe and efficient operation of various electrical appliances.
How Do You Wire A 50 Amp Rv Panel?
To wire a 50 amp RV panel, follow the manufacturer’s instructions. Typically, you’ll connect the power source to the main breaker and distribute it to individual circuits.
What Tools Are Needed For Wiring?
Basic tools include wire cutters, strippers, screwdrivers, and a voltage tester. Always ensure you have the correct tools for safety and efficiency.
Why Is Grounding Important For Rv Panels?
Grounding prevents electrical shocks and fires by directing stray electricity to the earth. It is essential for the safety of the RV electrical system.
Conclusion
Understanding the 50 amp RV distribution panel wiring diagram is essential. This knowledge ensures safe and efficient power usage in your RV. Always prioritize safety and double-check connections. Use the right tools and follow guidelines. Consult a professional if unsure.
Proper wiring prevents issues and keeps your RV’s electrical system running smoothly. Enjoy your travels with peace of mind, knowing your RV’s wiring is done correctly.


